

TL;DR:
- Removable wall panels offer a damage-free decorating option for renters and homeowners if the correct attachment method is used. DwellForms™ PET felt panels, installed with adhesive pads, are ideal for quick, reusable, and non-invasive wall design without drilling or painting. Proper surface testing, gentle removal at a low angle, and careful storage ensure these panels can be reused across multiple homes safely.
Removable wall panels can be a genuinely sensible option for renters and homeowners, provided you choose the right attachment method and check the surface compatibility before committing. The safest approach for bold, sculptural colour without drilling is a modular adhesive-pad kit such as DwellForms™ by Liftedplus. For short-term pattern changes on smooth, freshly painted walls, peel-and-stick paper works well. One caveat applies to both: matte or aged paint can lift when adhesive products are removed, so a patch test in an inconspicuous spot is non-negotiable before any full install.
Table of Contents
- What are damage-free wall panels, and which types suit renters?
- Which surfaces work best, and when should you avoid removable panels?
- How do you pick the right removable panel kit for your space?
- How to install renter-friendly panels without damaging your walls
- How do you remove panels cleanly and avoid paint damage?
- Cleaning, storing and getting the most reuse from your panels
- Where to use removable panels and how to style a feature wall
- Why we recommend DwellForms™ for renters wanting colour without commitment
- Your pre-install checklist before buying or fitting panels
- Key takeaways
- The case for colour that commits to nothing permanent
- Ready to try a DwellForms™ kit in your space?
- Useful sources and further reading
- FAQ
What are damage-free wall panels, and which types suit renters?
The phrase “damage-free wall panels” describes any panel system designed to be removed without leaving lasting marks on the wall behind it. In practice, no adhesive product is unconditionally safe on every surface, but the term is a useful shorthand for non-permanent, renter-conscious installation methods.
The main types available in Australia fall into five broad categories:
Adhesive-pad modular kits attach panels using tested, repositionable pads. No drilling, no screws. DwellForms™ by Liftedplus uses this method, delivering sculptural PET felt panels that press directly to the wall and release cleanly when removed correctly.
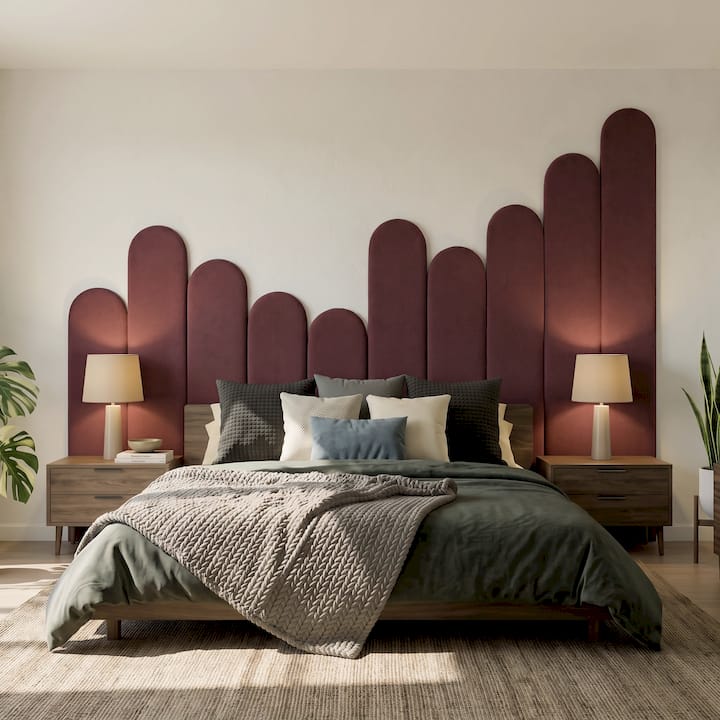
Peel-and-stick panels and paper work like a large sticker — quick to apply and often removable when the surface is compatible. They suit smooth, satin-finish walls for short-term use.
Hook-and-loop systems (such as industrial Velcro) bond a fabric strip to the wall and a matching strip to the panel back. Reusable and repositionable, though the wall-side strip still requires careful removal.
French cleats and Z-clips offer a gravity-locked, hidden interlock that is secure and removable but requires small fixings in the wall. These suit heavier panels where adhesive pads cannot carry the load, though they are not truly no-drill.
Freestanding frames avoid wall contact entirely. They are the most cautious option where tenancy agreements prohibit any wall contact, though they limit placement flexibility.
| Panel type | Install ease | Likely wall impact | Reusability | Typical weight range |
|---|---|---|---|---|
| Adhesive-pad modular kits | High | Low (if patch-tested) | High | Light to moderate felt panels |
| Peel-and-stick paper | High | Low to moderate | Low to medium | Light decorative panels |
| Hook-and-loop systems | Medium | Low to medium | High | Light to moderate panels |
| French cleats / Z-clips | Medium | Low (small fixings) | High | Moderate to heavy panels |
| Freestanding frames | High | None | High | Any weight |
Which surfaces work best, and when should you avoid removable panels?
Surface finish is the single biggest variable in how cleanly a removable panel comes away. Matte and highly porous paints are more likely to lift when adhesive products are removed than satin or semi-gloss finishes. The older the paint, the more brittle the bond between paint and plaster, and the greater the risk of lifting a layer with the panel.
Freshly painted walls present a different problem: paint that has cured for less than four weeks may not have reached full hardness, making adhesive removal more likely to pull the surface. Textured plaster and wallpaper reduce contact area for adhesive pads, which can cause panels to fail or pull unevenly. High-humidity rooms and walls in direct, intense sun also affect adhesive performance over time.
For renters specifically, check your tenancy agreement for any clause about wall modifications or alterations. In most Australian states, minor, reversible changes are permitted, but “minor” is not always defined. Discussing visible changes with your property manager before installation, and keeping receipts for sample kits as evidence of your approach, puts you in a much stronger position at inspection time.
How do you pick the right removable panel kit for your space?
The decision comes down to four practical questions: how long do you plan to leave the panels up, how bold do you want the result, what is your wall surface like, and what happens when you move?
Modular adhesive-pad kits are the right choice when you want colour-led, sculptural impact that travels with you. They are designed to be rearranged, extended, and taken to a new home. The panel backing material matters here: PET felt panels are lightweight relative to their visual presence, which keeps adhesive-pad requirements manageable.
Peel-and-stick paper suits short-term use on smooth, satin-finish walls where the priority is pattern rather than texture. It is less reusable than a modular kit; most peel-and-stick products do not survive multiple removals and reapplications without losing adhesion.
On budget, removable wall panel options in Australia vary widely, with peel-and-stick rolls costing less and modular kits priced higher, depending on size and features. Sample kits, where available, let you test colour and adhesion before committing to a full order. Liftedplus credits the cost of a DwellForms™ sample kit toward a full kit purchase, which removes most of the financial risk from testing.
Pro Tip: Check the pad weight rating in the product specifications before buying. A pad rated for 500g per set on a smooth surface may perform very differently on a textured or matte-painted wall. If the spec sheet does not list a surface-specific weight rating, contact the supplier before ordering.
How to install renter-friendly panels without damaging your walls
Follow the manufacturer’s patch-test instructions and stay within the stated weight limits, then work in measured stages rather than rushing the full layout in one session.
For adhesive-pad modular kits
- Prepare the surface. Wipe the wall with a lint-free cloth and the cleaner recommended by the manufacturer (usually isopropyl alcohol or a mild, residue-free spray). Allow to dry fully.
- Measure and mark. Use a spirit level and painter’s tape to mark the outer boundary of your panel layout. This is your alignment guide and prevents crooked rows.
- Do the patch test. Press one adhesive pad to the wall in a hidden spot. Wait 24–48 hours, then remove slowly. If paint lifts, stop and reassess the surface.
- Apply pads to the panel back. Follow the manufacturer’s placement diagram. Press each pad firmly for the recommended hold time (typically 30 seconds per pad).
- Press the panel to the wall. Hold firmly for the full recommended time. Do not slide the panel once it contacts the wall.
- Check alignment before adding the next panel. Use your painter’s tape guide and a spirit level. Correct small gaps now rather than after the full layout is in place.
- Allow full cure time. Most adhesive pads reach full strength after 24–72 hours. Avoid pulling or adjusting panels during this window.
For peel-and-stick paper
- Start at a vertical reference line (use a plumb bob or spirit level, not the room corner, which is rarely truly vertical).
- Peel back only the top 10–15 cm of backing at a time and smooth downward with a squeegee or flat card to avoid air bubbles.
- Trim edges with a sharp craft knife against a metal ruler rather than scissors.
- On textured walls, peel-and-stick paper requires no water or drying time but may not adhere fully to raised surfaces.
Tools and supplies checklist: spirit level, painter’s tape, lint-free cloths, manufacturer-recommended cleaner, squeegee or flat card, sharp craft knife, metal ruler, pencil.
Pro Tip: Cut a simple cardboard alignment jig the width of one panel. Use it to space each panel consistently without re-measuring every time. For a repeating modular layout, this alone halves the install time and keeps rows visually tight.
How do you remove panels cleanly and avoid paint damage?
Remove slowly, follow the product’s removal instructions, and always test a small section before pulling the full panel away from the wall.
The angle of removal matters more than most guides acknowledge. Pulling a panel straight out from the wall concentrates force at a single point and is the most common cause of paint lift. Instead, peel back one corner at a very low angle, almost parallel to the wall surface, and work gradually across the panel. If the manufacturer permits it, a hairdryer on a low heat setting can soften adhesive pads and reduce the force needed, but only use heat when the product instructions explicitly allow it.
For adhesive residue left on the wall after panel removal, a small amount of isopropyl alcohol on a soft cloth will dissolve most pad residues without affecting paint. Test the solvent on a hidden area first. Avoid acetone or petroleum-based solvents, which can strip paint finish.
Minor scuffs or small areas of paint loss can often be touched up with a small pot of matching paint, which is worth keeping from your original move-in. For significant paint lift, a professional painter can patch and blend the area; in most Australian states, the cost of repairing damage caused by a tenant’s modifications falls to the tenant, so acting promptly and documenting the process protects your bond.
Cleaning, storing and getting the most reuse from your panels
PET felt panels wipe clean with a slightly damp cloth. Avoid abrasive cloths or scouring pads, which will pill the felt surface. For dust accumulation, a soft brush attachment on a vacuum works well. Do not soak felt panels or expose them to prolonged moisture.
Peel-and-stick surfaces can be wiped with a damp cloth and mild detergent. Avoid anything solvent-based, which can cloud or lift the printed surface.
For storage between rentals or during a move:
- Store panels flat, not rolled or stacked at an angle, to prevent warping.
- Wrap in acid-free tissue or a clean cotton sheet to keep dust off the surface.
- Keep out of direct sunlight and away from damp areas; UV exposure fades colour and humidity can affect adhesive pad performance.
- Label each panel or group by colour and wall position so reinstallation at a new address is straightforward.
Adhesive pads on modular kits typically have a finite number of press-and-release cycles before their tack reduces. Check the manufacturer’s guidance on pad replacement; most modular systems allow you to replace pads individually rather than replacing the whole panel. A panel that no longer holds firmly is not at end of life, just in need of fresh pads.
Where to use removable panels and how to style a feature wall
The bedroom wall behind the bed is the most forgiving starting point for a first removable feature wall. It is a contained surface, usually away from moisture and direct sun, and the bed itself frames the panels naturally. A single colour in a sculptural modular layout creates the kind of considered, architectural quality that paint alone rarely achieves.
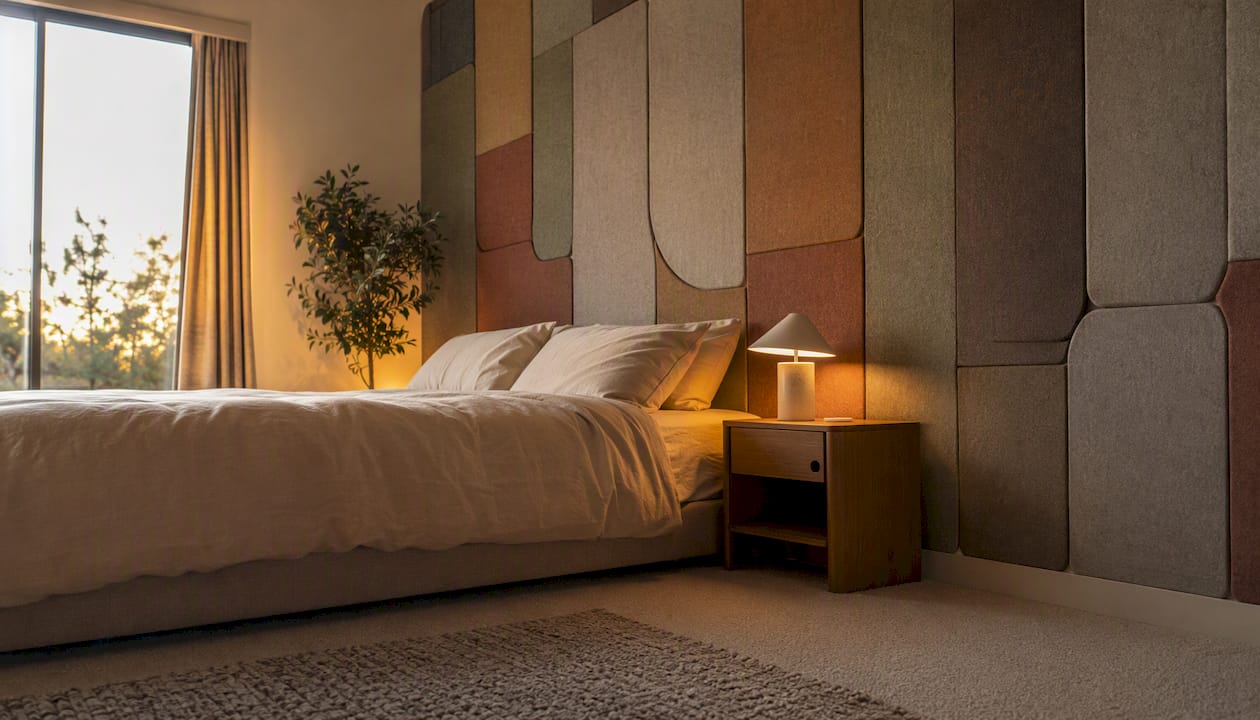
Living rooms reward bolder choices. A living room feature wall without renovation works particularly well when the panel layout runs floor to ceiling on a single wall, pulling the eye toward a focal point rather than spreading colour thinly across the room. Tone-on-tone arrangements, where panels in two close shades of the same colour create depth through shadow and form, tend to read as more sophisticated than high-contrast combinations in smaller spaces.
Hallways are underused. A linear panel kit running along a narrow hallway wall adds rhythm and warmth to a space that is usually left entirely blank in rentals. The repetition of a single panel form along a corridor creates a sense of intention that transforms the feel of the whole home.
Home offices benefit from a panel backdrop that reads well on video calls without being distracting. A mid-tone, textured felt layout behind a desk gives depth to the frame without competing with the speaker.
Pro Tip: Before ordering a full kit, photograph your wall in the actual lighting conditions you live with, morning and evening. Colour reads very differently under warm artificial light than under cool daylight. A sample kit lets you hold the panel against the wall in both conditions before committing.
For feature wall ideas without paint, pairing a modular panel layout with simple, low-profile furniture anchors the wall as the room’s centrepiece rather than competing with it.
Why we recommend DwellForms™ for renters wanting colour without commitment
DwellForms™ modular PET felt kits by Liftedplus are designed specifically for no-drill, adhesive-pad installation, delivering sculptural texture and bold colour without painting, drilling, or permanent alteration. The panels are precision-cut from recycled PET felt, made from 100% recycled plastic, and the modular format means you can rearrange, extend, or take the whole layout to a new address.
Key reasons DwellForms™ suits renters:
- No-drill installation using tested adhesive pads, with no screws, battens, or construction adhesive.
- Modular and extensible: start with a core kit and add extension packs to scale the feature wall as your space or confidence grows.
- Sample kits credited toward full orders, so you can test colour and adhesion on your specific wall before committing to a full purchase.
- Installation guides and styling support are available directly through Liftedplus, covering layout ideas, colour combinations, and surface preparation.
- Made from 100% recycled materials, which aligns with the broader trend toward reusable, lower-waste interior elements.
The DwellForms™ Skyline Kit and the Linear Feature Kit are the two most popular starting points, each offering a distinct silhouette and a range of colour options.
Your pre-install checklist before buying or fitting panels
Run through these checks before placing an order or pressing a single pad to the wall.
Wall and surface checks:
- Measure wall height and width; calculate how many panels or rolls you need, including a small buffer for trimming.
- Identify your paint finish (matte, satin, or semi-gloss) and estimate how long ago the wall was last painted.
- Check for textured plaster, wallpaper, or moisture-prone areas that may affect adhesion.
Tenancy and landlord checks:
- Read your tenancy agreement for any clause about wall modifications or alterations.
- Photograph the wall in its current condition before installation, and again after removal, for your tenancy records.
- Consider speaking with your property manager before installing anything visible, particularly in common areas or on feature walls near entry points.
Questions to ask your property manager:
- Are minor, removable wall modifications permitted under the tenancy agreement?
- Is there a preferred method for wall alterations, or specific materials to avoid?
- Who is responsible for minor paint touch-ups at the end of the tenancy?
Product checks:
- Order a sample kit and complete a 24–48 hour patch test before the full install.
- Confirm the pad weight rating against your panel weight and surface type.
- Check the returns policy and whether sample kit costs are credited toward a full order.
Key takeaways
Modular adhesive-pad kits are the most renter-friendly approach to removable wall panels, delivering bold colour and sculptural texture without drilling, painting, or permanent alteration, provided you patch-test first and follow the manufacturer’s weight limits.
| Point | Details |
|---|---|
| Patch-test before every install | Press one pad to a hidden wall area for 24–48 hours; if paint lifts, the surface is not suitable. |
| Match the method to the surface | Satin and semi-gloss finishes suit adhesive pads; matte and textured walls carry higher lift risk. |
| Remove at a low, parallel angle | Peeling almost flat to the wall surface reduces the force that causes paint damage during removal. |
| Store panels flat and labelled | Flat storage prevents warping; labelling by colour and position makes reinstallation at a new address straightforward. |
| DwellForms™ for long-term renter impact | Liftedplus’s modular PET felt kits install without drilling, travel with you, and can be extended with add-on packs. |
The case for colour that commits to nothing permanent
There is a tendency in renter-focused design advice to treat removability as the ceiling of ambition: choose something safe, something neutral, something that will not cause a fuss at inspection. That framing undersells what removable wall design can actually achieve.
The more interesting question is not “how do I avoid damage?” but “how do I make this space feel genuinely mine, without paying for it twice?” A modular PET felt kit answers that question differently to a peel-and-stick roll. The felt has weight, shadow, and form. It reads as a considered design decision rather than a temporary measure. And because it travels with you, the investment compounds across every home you live in.
What renters often underestimate is how much of the “damage risk” conversation is actually a surface-preparation conversation. Most adhesive failures and most paint-lift incidents trace back to skipping the patch test, ignoring the paint finish, or rushing the removal. The product itself is rarely the problem.
The patch test is not a formality. It is the single step that separates a clean removal from a bond dispute. Do it every time, on every new wall, regardless of how confident you feel about the surface.
Ready to try a DwellForms™ kit in your space?
Colour without commitment is not a compromise. It is a design strategy, and DwellForms™ by Liftedplus is built around it.

Start with a sample kit to test colour and adhesion on your specific wall before committing to a full order. Sample kit costs are credited toward any full DwellForms™ purchase, so the testing step costs you nothing in the long run. From there, the DwellForms™ Core Kits give you a complete no-drill feature wall in a single order, with extension packs available to scale the layout as your confidence grows. Installation guides, layout ideas, and styling support are included, so you are not working it out alone. Browse the full range and find the kit that fits your wall at liftedplus.com.
Useful sources and further reading
A short list of the most useful resources referenced in this guide, with notes on what each covers.
- The 3 Best Removable Wallpapers of 2026 | Wirecutter — independent testing of peel-and-stick products, with detailed notes on paint compatibility and removal outcomes.
- How to install wall panels without adhesive | Sound Pro Solutions — practical guidance on French cleats, Z-clips, and freestanding frames for heavier panels.
- DwellForms™ No-Reno wall forms | Liftedplus — brand page covering DwellForms™ materials, philosophy, and the full product family.
- Decorative wall panels: a homeowner’s guide for 2026 | Liftedplus — deeper material and product guidance for homeowners comparing panel types.
- Wall decor ideas for renters without damage | Liftedplus — practical renter-focused ideas for non-permanent wall decor across different room types.
- Refresh your space without the renovation headache | One Day Doors & Closets — partner resource on renovation-free interior updates, useful for broader context on low-impact home improvements.
FAQ
How do you panel a wall without damaging it?
Use an adhesive-pad modular kit or peel-and-stick panels on a satin or semi-gloss painted surface, always completing a 24–48 hour patch test first. Remove panels slowly at a low angle parallel to the wall to minimise the risk of paint lift.
What is the cheapest way to cover a bad wall?
Peel-and-stick wallpaper is the lowest-cost entry point in Australia, though it suits smooth surfaces best. For a more durable and reusable result, a modular kit like DwellForms™ costs more upfront but travels with you across multiple homes.
Is wall panelling outdated in 2026?
Modular and removable wall panelling is growing in popularity, particularly among renters and apartment dwellers who want architectural texture without permanent renovation. The shift toward reusable, lower-waste interior elements has made panel systems more relevant, not less.
Which wall panel material is most durable for renters?
PET felt panels, such as those used in DwellForms™ by Liftedplus, are lightweight, resistant to everyday wear, and can be wiped clean with a damp cloth. Their durability across multiple installs and removals makes them a practical long-term investment compared to single-use peel-and-stick options.