
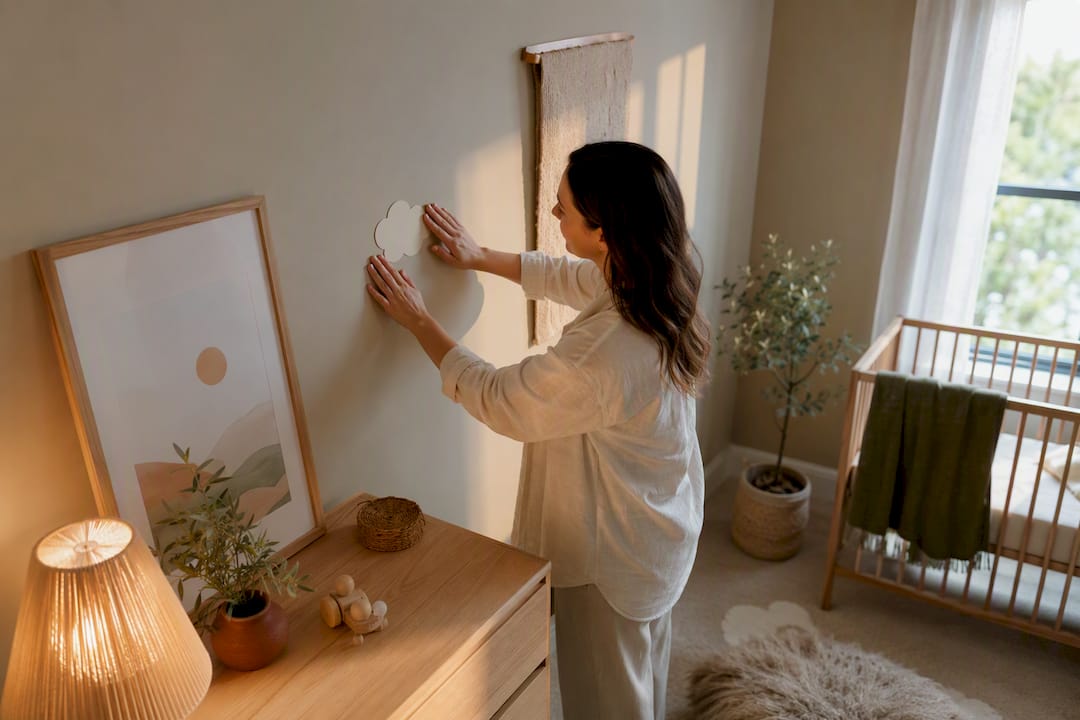
The best nursery wall decor without paint combines removable peel-and-stick decals or wallpaper, soft textile hangings, and modular removable panels like DwellForms™ for a proper feature wall, plus framed prints on adhesive hooks for smaller touches. The one rule that matters most: never hang anything heavy directly above the cot.
TL;DR:
- Peel-and-stick decals and wallpaper are quick, damage-free options that create a finished look, but should be limited to one wall or section to avoid removal issues.
- Modular felt panel systems like DwellForms™ offer textured sculptural impact and can be easily removed and reused, making them ideal for a feature wall in a rental nursery.
- Keep all decor above the cot lightweight or well clear to prevent fall risks, and avoid mounting anything with glass or small detachable parts over the sleeping area.
- Use adhesive strips rated for the weight of framed art or mirrors, and lean heavier frames against furniture to avoid wall damage.
- Document the wall before and after decorating to protect your security deposit and ensure the wall remains undamaged during removal.
Table of Contents
- Renter-friendly nursery wall ideas that don’t need a single drill hole
- How to choose between decals, textiles, panels and framed art
- Installing and removing nursery decor without wrecking the wall
- DwellForms™: colour and texture without touching a single wall stud
- Gallery walls and arrangement basics for a nursery
- Keeping the space above the cot genuinely safe
- Avoiding wall damage when you remove decor later
- Wall-safe magnets and magnetic boards for changeable decor
- Lightweight framed art without a single wall anchor
- Choosing a nursery theme that holds together without paint
- Author perspective: creating warmth in a rental nursery
- Bring the colour, skip the renovation
- Sources
- FAQ
Renter-friendly nursery wall ideas that don’t need a single drill hole
Nine months feels like a long time until it isn’t, and most expectant parents realise somewhere around week 30 that the blank wall behind the cot has been staring back at them for weeks. If you’re renting, that wall comes with rules attached: no holes, no paint, and a bond you’d rather not forfeit over a lapse in judgement with a Phillips head screwdriver.
The good news is that nursery wall decor without paint has never been easier to pull off well. Below are the options worth your time, roughly in order of impact.
1. Removable decals and peel-and-stick wallpaper
These are the fastest route to a finished-looking wall. Peel-and-stick wall decals typically go up in an afternoon with no specialised tools, and they remove cleanly when you follow the product’s instructions. Stick to one wall or one section rather than the whole room. A full-room wallpaper job on a rental is a bigger removal task than most people expect at handover time.
2. Textile hangings and tapestries
A woven wall hanging or tapestry brings warmth and softness that decals can’t match, hanging from a simple rod on adhesive hooks rather than a nail. Choose lightweight cotton or macramé pieces rather than heavy wool. The lighter the textile, the less strain on your adhesive and the longer it stays put.
3. Modular removable panels
This is where you get genuine sculptural impact rather than a flat print. Modular panel kits, made from precision cut felt and installed with tested adhesive pads, let you build a textured, colour-led feature wall in a few hours, then unclip and take it with you when you move. This category sits apart from decals and tapestries because it adds real dimension to a wall, not just pattern.
4. Framed prints and leaning art
You don’t need a frame on the wall at all. Prints in slim frames can lean against a low shelf or dresser, which sidesteps the “no holes” problem entirely, or hang from adhesive strips rated for the frame’s actual weight, not its apparent weight.
5. Floating ledges for books and toys
A shallow floating ledge, mounted with a heavy-duty adhesive strip rather than screws into a stud, gives you a spot to display picture books face out. Keep the load light. Ledges are for a handful of board books and a soft toy, not a shelf of hardbacks.
6. Washi tape murals and tape frames
Cheap, cheerful, and genuinely renter-safe. Washi tape can trace a simple mountain range, a rainbow arc, or a geometric frame around a print, and it peels off without a trace. It’s also the easiest option to change again in six months when your toddler develops opinions about colour.
7. Garlands, bunting and soft canopies
A fabric garland or bunting strung between two adhesive hooks adds movement and softness without weight. Canopies over a reading nook look gorgeous in photos, but keep them well clear of the cot itself, both for safety and so nobody’s midnight feed involves untangling tulle.
8. Leaning mirrors
A large leaning mirror amplifies natural light and makes a small nursery feel bigger, and it needs no wall fixing at all if it’s freestanding or leaning. If you do want one mounted, use an adhesive-rated anti-tip strap rather than a wall anchor.
9. Soft 3D felt decals and tactile pieces
Newborn vision responds well to simple shapes and high-contrast patterns, and soft felt wall pieces give a baby something to focus on that isn’t a flat printed cloud. Keep these on a side wall within a baby’s later crawling and standing reach, rather than right at cot height.
10. Lighting and lamps
A warm-toned lamp or a soft string light changes the entire mood of a room without touching the walls at all. This is the cheapest lever in the whole list and often the most underused.
A few of these ideas work well stacked, but not all of them at once. The single biggest styling mistake in rental nurseries isn’t picking the wrong decor, it’s picking six kinds of decor for one wall.
Pro Tip: Choose one focal piece for the wall behind or beside the cot, then keep everything else to small, well-spaced accents. A nursery with one confident statement and quiet supporting details reads as considered. A nursery with five competing prints reads as chaos, even if every individual piece is lovely.
How to choose between decals, textiles, panels and framed art
Start with the wall itself, not the decor. Freshly painted plaster, older wallpaper, textured render and bare brick all respond differently to adhesive, and a landlord’s lease may specify what’s allowed regardless of what the product claims. Read your tenancy agreement or ask before you buy anything that touches the wall.
From there, weigh up three things:
- Durability versus flexibility. Peel-and-stick decals and wallpaper commit you to one design for the length of your lease, more or less. Textiles and framed art can be swapped in an afternoon whenever the mood strikes.
- Texture and visual weight. A flat decal reads as pattern. A modular panel system reads as architecture, because it adds real depth and shadow to the wall rather than sitting flush against it.
- Colour and scale. Nursery colour guidance consistently points toward soft, muted palettes such as pale blue, sage, warm white and dusty pink, with simple repetitive motifs like clouds or dots rather than busy scenes. That guidance holds regardless of which decor category you choose.
Sizing matters more than most first-time parents expect. A focal piece above a dresser or change table works best at roughly two-thirds the width of the furniture underneath it, which keeps proportions calm rather than cramped or lost. Above the cot itself, the safest choice is often nothing at all, or something very light mounted well clear of the sleep space.
A modular panel system earns its place on this list when you want one wall to carry the whole room’s personality. Because kits are sold in sample colours and expandable packs, you can trial a palette on a small section before committing to a full feature wall, which matters when you’re choosing a colour for a room you might only live in for eighteen months. Layering textiles, rugs and furniture colour is a genuinely strong alternative if you’d rather leave every wall untouched and add warmth through soft furnishings instead.
Installing and removing nursery decor without wrecking the wall
Getting this right comes down to preparation, not luck.
- Clean and dry the wall first. Dust, grease and moisture are the main reasons adhesives fail. Wipe the surface with a damp cloth, let it dry fully, then test a small patch in an inconspicuous spot before committing to the whole piece.
- Match the adhesive to the weight. A light print needs a light-duty strip. A modular panel or a framed piece needs an adhesive pad rated for that weight, applied exactly as the packaging describes.
- Give it time to cure. Heavier peel-and-stick pieces generally hold better if you leave them undisturbed for the first 24 hours rather than testing the bond immediately.
- Keep placement sensible. Nothing heavy goes directly above the cot, and any hanging cords or ribbons stay well away from where a baby can reach as they grow.
- Remove slowly and at an angle. Pull adhesive strips down and across rather than straight out from the wall, which reduces the chance of pulling paint or plaster with it.
- Photograph the wall before and after. A quick photo at move-in and again once you’ve removed everything is the easiest way to prove to a landlord that the wall came back exactly as you found it.
Pro Tip: Keep the original packaging or product listing for anything you stick to a rental wall. If a landlord ever queries a mark on the wall, showing them the product’s own removal claims is far more persuasive than explaining it from memory.
DwellForms™: colour and texture without touching a single wall stud
DwellForms™ is a New Zealand designed modular wall system built specifically for renters who want more than a flat print. Each kit is made from precision-cut felt produced from
recycled plastic, and panels click together into a sculptural arrangement that goes up with adhesive strips designed for removability, no drilling, no paint, and no wallpaper paste involved.
What that means practically:
- Layout guides walk you through arranging panels into a shape before you commit to sticking anything down.
- Colour sample kits let you test a shade against your actual wall and lighting before ordering a full set.
- Removable, reusable design means the whole feature wall unclips and travels with you to your next place.
In a nursery, panels work best as a backdrop behind a reading nook, beside a change table, or as a feature wall opposite the cot, where they add colour and texture without sitting directly above the sleeping space. That last point matters: a textured panel wall is a lovely design statement, but it belongs on a wall the baby looks toward, not one hanging over them.
Gallery walls and arrangement basics for a nursery
A gallery wall in a nursery works differently to one in a living room. The goal isn’t density, it’s rhythm. Three to five small framed prints or soft felt shapes, spaced with equal gaps and aligned along one invisible horizontal line, read as intentional. Randomly scattered pieces of mismatched sizes read as clutter, especially at the eye level of a parent standing over a change table for the tenth time that day.
Keep the palette tight. Two or three colours across the whole arrangement, echoing the room’s dominant tone, will always look more considered than a rainbow of unrelated prints. If you’re working with adhesive hooks rather than picture rails, lay the arrangement out on the floor first, tape the paper templates to the wall to check spacing, then commit to sticking each piece once you’re happy with the layout. This avoids peeling and re-sticking, which shortens the life of most adhesive products.
One low-effort trick: hang the arrangement slightly off-centre to one side of the room rather than dead centre above furniture. It gives the eye somewhere to land without competing with the cot or dresser for attention, and it leaves the wall directly behind the cot clear, which brings us to the next point.
Keeping the space above the cot genuinely safe
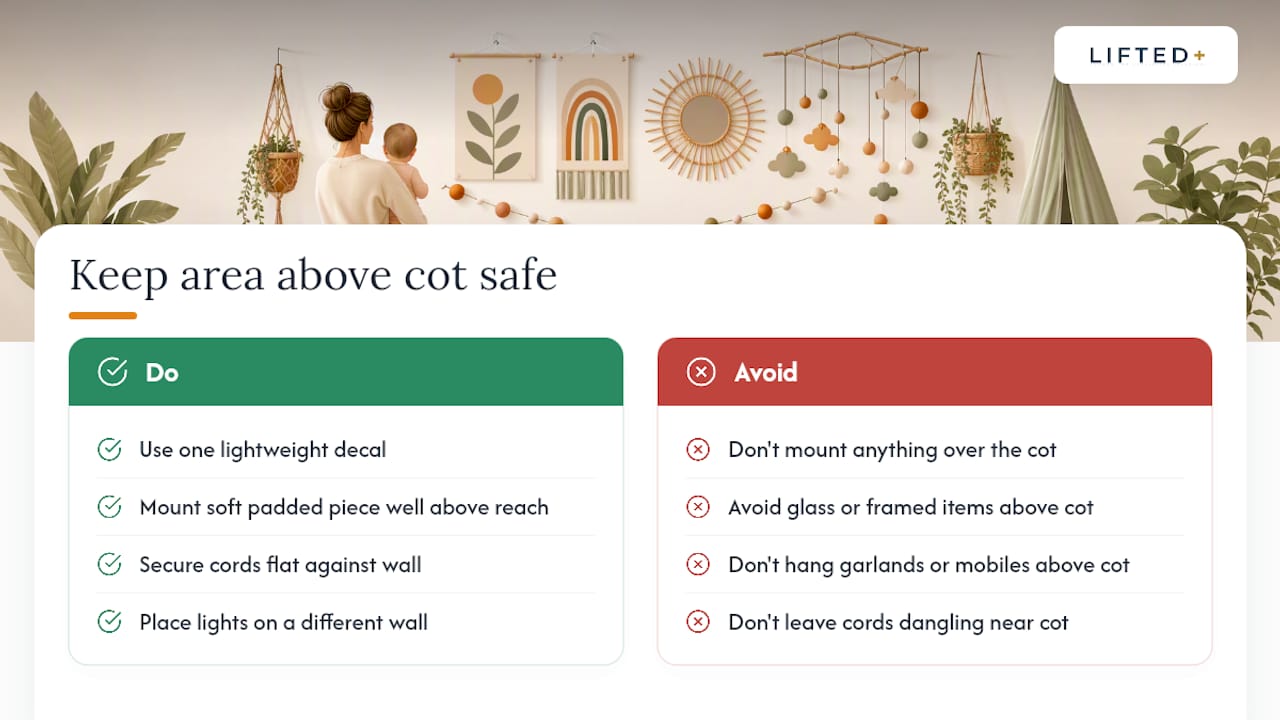
The cot itself sets the boundary for where decor doesn’t belong. Anything mounted directly above a sleeping baby carries a fall risk that no adhesive rating fully removes, because even the best-rated product can fail with age, humidity, or a firm tug from a curious toddler standing up in later months.
The safer approach is to treat the wall behind the cot as a “keep it light or keep it clear” zone. If you want something there, a single lightweight decal or a shallow, softly padded piece is a reasonable compromise, positioned well above where a standing toddler could reach and mounted with adhesive rated well beyond the item’s actual weight. Anything with glass, anything framed in wood or metal, and anything with small detachable parts belongs on a different wall entirely.
The same logic applies to garlands, bunting, and hanging mobiles. They’re gorgeous over a reading chair or change table, but a hanging cord within reach of a cot is a strangulation risk once a baby can pull themselves up, which happens earlier than most parents expect. Route cords well clear of the cot’s perimeter and keep any battery-powered lights or string lights on a wall away from the sleep zone, with cords secured flat against the wall rather than dangling.
None of this means the cot wall has to be boring. A soft, muted colour on an adjacent wall, or a textured panel feature on the wall the cot faces rather than the one it backs onto, gives a baby something calming to look at without anything overhead.
Avoiding wall damage when you remove decor later
Every renter’s real question isn’t “how do I put this up,” it’s “will I get my bond back.” The answer depends less on the product and more on the process.
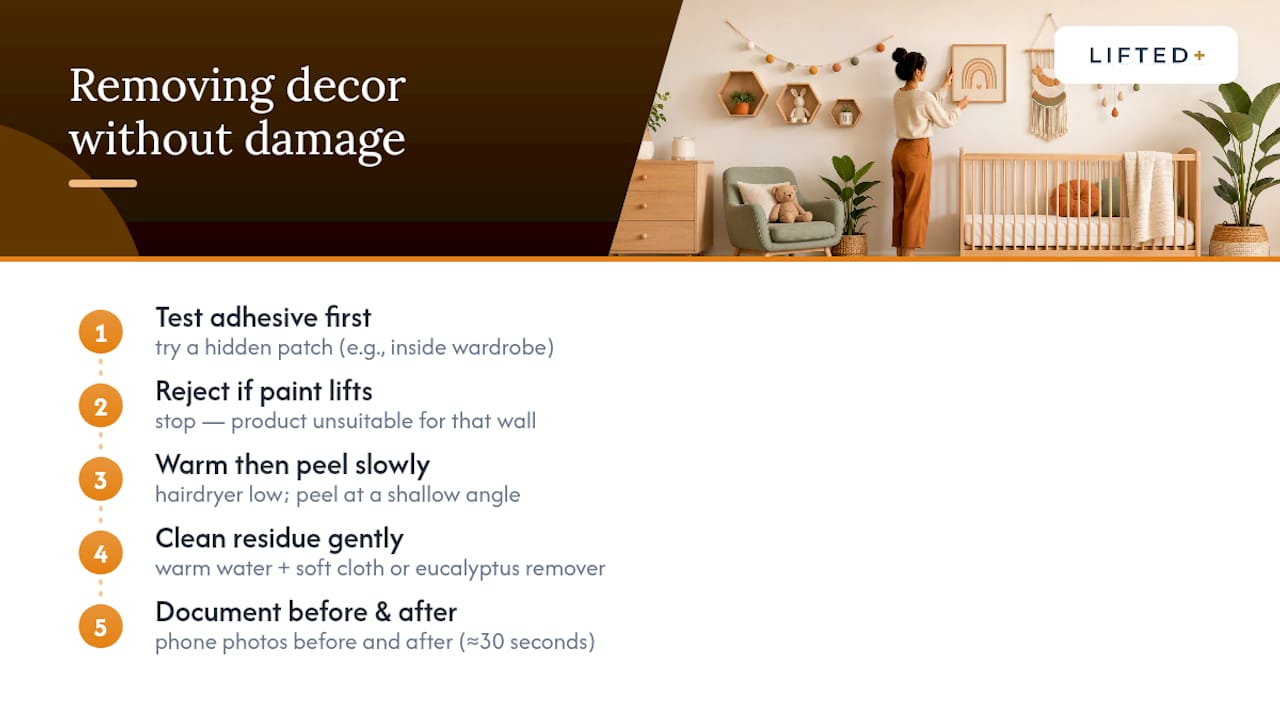
Start by testing any adhesive on a hidden patch of the same wall, ideally somewhere like inside a wardrobe, before applying it to a visible spot. Painted plaster, older paint jobs, and freshly painted walls all hold adhesive differently, and a wall painted within the last few weeks is especially prone to pulling paint away when strips come off. If your test patch lifts any paint, that product isn’t right for that wall, full stop.
When it’s time to remove something, patience beats force every time. Warm the adhesive slightly with a hairdryer on a low setting if the product allows it, then peel slowly at a shallow angle rather than pulling straight off the wall. Any leftover residue usually lifts with warm water and a soft cloth, or a small amount of eucalyptus-based adhesive remover on paint that’s fully cured.
Keep a photo of the wall from before you started decorating and another once everything’s down. It’s the simplest way to show a landlord or property manager that the wall is exactly as it was, and it takes thirty seconds on your phone. Documenting the room before and after is standard advice for a reason: it protects your bond and your peace of mind in equal measure.
Wall-safe magnets and magnetic boards for changeable decor
A magnetic board mounted with adhesive strips gives you a spot for artwork, milestone cards, or a growth chart that changes as often as you like, without a single new hole or sticker residue each time. Because the board itself is the only thing touching the wall, everything on its surface, magnets, clips, small prints, comes and goes freely.
This is particularly handy in a nursery because the “decor” your child interacts with changes constantly in the first two years: birth details, hospital bracelets, a first sonogram print, then finger paintings not long after. A magnetic board lets all of that rotate through without a fresh adhesive hook for every new addition.
Look for flat magnetic sheets or a lightweight magnetic canvas rather than a heavy metal board, since the lighter the base, the less strain on the adhesive holding it up. Position it away from the cot, at a height where you’ll actually use it during nappy changes or feeds, and treat it as the flexible, low-commitment cousin of the gallery wall: useful for the things that need to change often, while your more permanent statement pieces do the heavier visual lifting elsewhere.
Lightweight framed art without a single wall anchor
Framed prints look considerably more finished than an unframed poster, but frames add weight, which is exactly what makes most renters nervous about hanging them. The fix is choosing the mounting method to match the frame, not guessing.
For anything under roughly 500 grams, a rated adhesive hook or strip designed for picture frames will generally hold reliably, provided the wall surface is clean and dry and the product’s weight rating isn’t just met but comfortably exceeded. For heavier frames, or anything with glass, leaning the frame against a dresser or floating ledge sidesteps the weight question entirely, since gravity and the furniture do the holding rather than an adhesive bond.
Command strips and similar damage-free mounting products remain the standard choice for most nurseries because they’re widely available, rated by weight, and designed to come off cleanly when you follow the manufacturer’s removal instructions exactly, usually a slow, angled pull rather than a straight yank. Buy for the frame’s actual weight, not an estimate, and when in doubt, size down the frame rather than up.
Choosing a nursery theme that holds together without paint
A theme in a nursery isn’t about matching every element to a cartoon character. It’s about picking two or three colours and one or two motifs, then repeating them lightly across decals, textiles and any modular panel choices, so the room reads as a whole rather than a collection of separate purchases.
Start with the colour, not the theme. A palette built around sage green, warm white and one accent, like dusty pink or ochre, gives you a calm base that works whether your “theme” ends up being woodland animals, simple shapes, or nothing more specific than “soft and warm.” Layer texture next: a knit throw on the chair, a felt hanging on one wall, a woven basket for toys. Texture does more to make a room feel finished than an extra print ever will.
Keep pattern to one dominant motif at most. If your decals feature clouds, don’t also introduce stars, rainbows and animals in the same sightline. Repetition of a single simple shape reads as considered; a mash-up of every “nursery” Pinterest board you’ve saved reads as indecision. If you’re drawn to a modular panel colour, let that panel colour set the palette for everything else in the room, rather than trying to match a panel to decor you bought first.
Author perspective: creating warmth in a rental nursery
Renting doesn’t mean the nursery has to feel temporary. Start with one wall, one strong colour choice, and build outward from there rather than trying to solve the whole room at once. A single confident feature, whether that’s a tapestry or a textured panel wall, will always do more than five scattered pieces. Keep the space calm rather than crowded. Babies notice less than we assume, and they settle faster in rooms that feel unhurried.
— Michelle
Bring the colour, skip the renovation
If you’ve read this far, you already know the honest trade-off with decals and tapestries: they’re quick and cheap, but they read as flat pattern rather than a real feature wall. DwellForms™ closes that gap. It’s a modular felt panel kit that installs with tested adhesive pads, no drilling, no paint, and no landlord conversation required, and it gives a rental nursery the kind of sculptural, considered wall you’d normally only get by renovating.

Start by ordering a colour sample kit to see how a shade actually sits against your wall and light before committing to a full arrangement, or browse the Linear Feature Kit if you’re after a more structured layout. Every wall behaves a little differently depending on surface and paint history, so test your sample piece in the spot you’re planning for the feature wall, follow the included installation guidance, and build outward from there once you’re confident it holds.
Sources
For more layout ideas, see renter feature wall examples and no-drill decor options. For product comparisons, read wall panels versus art prints.
- Diamond Photo — peel-and-stick wall decal product page
- Te Whāriki resource on creating a harmonious environment for infants and toddlers
- WiseMove — renter decor hacks for New Zealand rentals
- Houzz — 7 ways to decorate your walls when painting is not an option
FAQ
What are some ways to decorate walls without using paint?
Removable peel-and-stick decals or wallpaper, textile hangings, modular removable panels, framed art on adhesive hooks, and washi tape designs all work well without paint.
What should I put on an empty nursery wall?
A single focal piece, such as a soft textile hanging, a modular panel feature, or one well-sized framed print, works better than several small scattered items, and keeps the space calm rather than overstimulating.
What can I put on a wall instead of painting it?
Temporary wallpaper, tapestries, decals, floating shelves, leaning mirrors and gallery-style arrangements are all widely recommended paint alternatives for rental homes.
How do I decorate walls without ruining the paint underneath?
Test any adhesive on a hidden patch first, keep the wall clean and dry before applying anything, and remove products slowly at an angle rather than pulling straight off, which is the step most likely to lift existing paint.
Is a modular panel system like DwellForms™ safe to use in a nursery?
Modular panels install with tested adhesive pads and no drilling, making them suitable for feature walls beside or opposite a cot, though heavy items generally shouldn’t be placed directly above where a baby sleeps.