

Yes, modular PET felt wall panels are a practical way for renters and homeowners alike to bring colour and texture into a space without touching a drill or a paint tin. Used correctly, with the right adhesive and the right paperwork, they come down as cleanly as they go up. In New Zealand, that means a written request to your landlord, who has 21 days to respond to a minor change request. We offer modular kits and colour sample packs built for flexible, reversible styling.
Key Takeaways
Modular PET felt wall panels provide a flexible, reusable, and renter-friendly way to add color and texture to interior walls without permanent damage or renovation.
| Point | Details |
|---|---|
| Reversible installation | Panels are designed to be easily installed, removed, and reconfigured without damaging walls, making them ideal for renters. |
| Suitable for renters and homeowners | Panels work well for short-term tenants, apartment dwellers, or homeowners testing a bold design before permanent changes. |
| Fast and mess-free updates | Installing panels requires no drying time, fumes, or long-term commitments, allowing quick updates for room styles. |
| Landlord approval process | A written request describing the panels and adhesive method is necessary, with landlords responding within 21 days in New Zealand. |
| Next steps with Liftedplus | Liftedplus offers Core and Extension Kits for scalable wall coverage, along with color samples to ensure matching expectations. |
Table of Contents
- What reusing wall panels actually means and who it suits
- Why a removable feature wall makes sense for renters and homeowners
- Choosing panels and getting landlord consent
- Installing, reconfiguring and removing panels without drilling
- Caring for your panels and moving them to a new home
- A renter’s honest take on removable walls
- A quick route to renter-safe, reconfigurable feature walls
- FAQ
- Sources
What reusing wall panels actually means and who it suits
When we talk about reusing wall panels, we mean modular, removable PET felt panel kits designed to be installed, taken down, rearranged and reinstalled, not reclaimed timber boards repurposed from an old renovation. That’s a different project entirely, with different tools and different risks. What we’re describing here is a decorative system: precision-cut felt panels, made from recycled plastic, that click into a pattern on your wall and lift away again when your taste, your lease or your address changes.
The felt itself has a soft, dimensional surface that catches light differently to flat paint, which is part of why a single wall of panels can look architectural rather than applied. It’s forgiving material to work with: light, easy to cut for edges, and durable enough to survive being packed up and reused in a new room.
This approach suits:
- Renters in short or uncertain tenancies who still want a space that feels like theirs
- Apartment dwellers who want visual impact without negotiating major works
- Homeowners who want to test a bold colour or pattern before committing to anything permanent
- Anyone decorating a room in stages, where the wall treatment might shift as the rest of the space comes together
Why a removable feature wall makes sense for renters and homeowners
The case for a reconfigurable wall system comes down to risk and speed. For renters, the biggest win is reversibility: when panels are fitted with tested adhesive pads and installed with landlord consent, there’s far less at stake for your bond than with paint, wallpaper or fixed battens. For homeowners, the appeal is different but related. You get the architectural impact of a feature wall, texture, shadow, a considered colour story, without the mess, drying time or long-term commitment of a paint job.
Design-wise, panels let you change direction fast. Swap a muted charcoal arrangement for a warm terracotta one in an afternoon, or build asymmetry into a hallway that would otherwise stay flat and forgettable.
- Colour agility: change a wall’s mood without repainting
- Texture and depth: felt panels create shadow lines that paint can’t
- No drying time or fumes: install and live with it the same day
- Scalable coverage: a single Core Kit suits a small feature area, with Extension Kits for larger walls
Testing your adhesive on a hidden patch before full install is one of the simplest ways to reduce the risk of surface damage, and it’s a step worth building into any install plan regardless of wall type.
Choosing panels and getting landlord consent
Before you buy, measure the wall and decide how much of it you want to cover. A single accent panel cluster behaves differently to a full-wall treatment, and getting the scale right up front saves a second order later.
- Measure your wall and sketch roughly where the panel cluster will sit
- Order a Colour Sample pack to see the shade and texture in your own light
- Confirm the wall surface suits adhesive pads (painted plasterboard is ideal; heavily textured or damp surfaces need more care)
- Choose a Core Kit sized to your wall, adding an Extension Kit if you’re covering a larger area
- Write your landlord consent request before you install anything
For New Zealand tenancies, a written request is the starting point. Describe what you’re installing, how it attaches (adhesive pads, not drilling or nails), and confirm you’ll remove it and leave the wall in substantially the same condition at the end of the tenancy. Landlords must respond in writing within 21 days for a minor change request, and the Residential Tenancies Amendment Act 2020 sets out what counts as a minor change under section 42. Official response templates show that landlords can attach reasonable conditions to their approval, and may agree the change can stay at the end of the tenancy rather than requiring removal.
Pro Tip: Attach a photo of your Colour Sample to the consent request. It shows your landlord exactly how small and reversible the change is, which tends to speed up approval.
For more on protecting your bond while you do this, our guide on protecting your bond with no-drill panels walks through the practical side in more detail.
Installing, reconfiguring and removing panels without drilling
A clean install starts before the panels arrive. Check your wall finish (painted plasterboard works best), note the room’s humidity, and avoid installing straight after painting while the surface cures. Lay the panels out on the floor first to confirm your pattern, then run a test patch with an adhesive pad in an inconspicuous spot.
We tested several well-known pull-tab adhesive systems, including popular 3M-style tabs, before settling on our own nano-adhesive pads, which held more securely and lifted away with noticeably less residue in our own trials. No adhesive is entirely damage-proof, so the test patch step matters regardless of which panels you’re using.
- Dry fit your pattern on the floor or against the wall to confirm spacing
- Apply the nano-adhesive pads to the back of each panel, following the pad placement guide
- Press each panel firmly against the wall, working from one corner outward
- Step back and check alignment before the final panels go up
- Add Extension Kit panels at any time to widen or reshape the design
To reconfigure, gently peel each panel from one corner, working slowly rather than tugging. If you ever need to remove the whole wall, our step-by-step removal guide covers residue clean-up in full.
- Warm the pad slightly with your hand before peeling if it feels stubborn
- Clean any residue with a soft cloth and warm water, not solvents
- If paint lifts with the pad, a specialist patch repair is worth arranging before you reinstall
Pro Tip: Keep a note of which pads you used where. It makes reconfiguring months later far quicker.
Caring for your panels and moving them to a new home
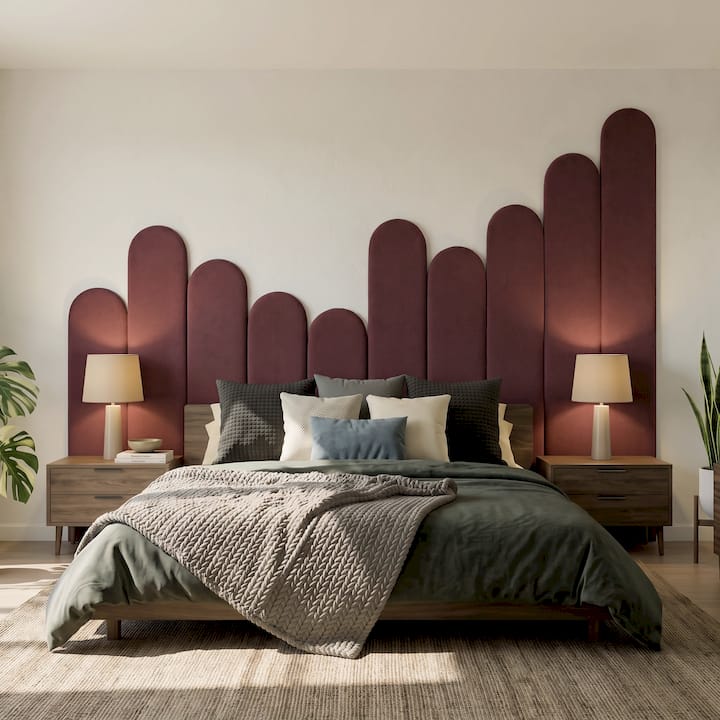
PET felt panels are low maintenance. A soft brush or a light vacuum attachment lifts dust, and a damp cloth handles the occasional mark. Avoid soaking them, since the felt is designed to stay dry.
When you’re ready to move, remove panels slowly from one corner, store them flat or loosely rolled to protect their shape, and keep them away from direct heat or damp while in storage or transit. Colour holds well over time when panels are kept out of prolonged direct sun.
- Dust with a soft brush or vacuum brush attachment
- Spot clean marks with a barely damp cloth
- Store flat in a dry space, away from heat
- At the end of a tenancy, document the wall’s condition with photos before and after removal, and offer to reinstall if your new landlord is open to it
A renter’s honest take on removable walls
We built DwellForms™ around a simple frustration: rentals rarely let you make a space feel like yours, and most “temporary” decorating advice still asks you to risk your bond. The brands that worked for us weren’t necessarily the most famous ones, they were the ones that held up to an actual test patch and came off clean. If you’re nervous about committing, order a single Colour Sample before anything else. It costs little, tells you everything about how the felt looks in your light, and gives your landlord something concrete to say yes to.
— Michelle
A quick route to renter-safe, reconfigurable feature walls
Building a feature wall shouldn’t mean choosing between a bare rental wall and a renovation you can’t take back. Our DwellForms™ Core Kits give you a ready-made starting pattern sized for a single accent wall, and our Extension Kits let you grow that design as your space or your confidence changes.

If you’re still deciding on colour, start with our Colour Samples rather than committing to a full kit outright. It’s the lowest-risk way to see a shade on your own wall, and it’s the easiest kind of request to put to a landlord.
FAQ
What are removable wall panels made from?
The material is light enough to install and remove by hand with adhesive pads, no drilling required.
Do I need landlord permission to install wall panels in a rental?
Yes, in New Zealand you need to request written consent before fitting wall panels, even when they’re removable. Landlords must respond to a written request for a minor change within 21 days, and reasonable conditions may be attached to their approval.
Will removable panels damage my walls?
No adhesive is completely damage-proof, which is why testing a pad on a hidden patch before full installation matters. Our nano-adhesive pads were selected after testing several options, including well-known pull-tab brands, for how cleanly they lifted away in our own trials.
Can I take my wall panels with me when I move?
Yes, that’s one of the main reasons modular panel kits suit renters. Panels can be removed, stored flat, and reinstalled in a new home, and our guide to extending wall panels covers how to adapt a layout to a different wall size.
What counts as a ‘minor change’ under New Zealand tenancy law?
The Residential Tenancies Amendment Act 2020 defines minor changes as those unlikely to damage the property and easily reversible, which generally covers fixtures like removable wall panels. Tenants are still expected to remove such fixtures and return the wall to substantially the same condition at the end of the tenancy, unless the landlord agrees otherwise.
Sources
Recommended
- Removable Wall Panel Ideas For NZ Renters In 2026
- Protect Your Bond: 6 Steps For NZ Renters To Use No Drill Panels
- Keep Your Bond: No Drill Recycled Plastic Wall Art For Renters
- How To Transform Living Spaces Without Drilling A Hole
This article is for general information and inspiration only. Product performance and results may vary depending on individual circumstances, surfaces and installation.