
A feature wall is judged at its edges. The pattern may be bold and the colour confident, but if the end of a run is ragged, the corner gapes or the cut face is fuzzy, the eye goes straight to the flaw. Finishing panel edges well comes down to four things: a clean cut, a stable edge, a deliberate termination (trim, gap or return) and, for rigid board panels, a sealed cut face. This guide covers each, for rigid decorative panels and for removable felt systems, with a focus on what renters in New Zealand can do without drilling or permanent changes.
Key takeaways
- A clean edge starts with the cut: full support, a steady hold and a trial cut on offcuts before you touch the real panel.
- Rigid board panels need their cut edges sanded square and, where the manufacturer specifies it, sealed. Felt panels need a precise cut and a planned finish at the wall edge.
- Corners and joins look best when you plan them on the floor first, using a small, consistent gap rather than forcing panels tight.
- For renters, the neatest edge is often one you never have to cut: choose a layout that ends where the wall ends, or use extension packs to adjust a run.
- No adhesive is completely damage-proof, so test small, work gently and keep removal in mind from the start.
Table of Contents
- Why the edge decides how the wall looks
- Start with the cut: preparation and technique
- Sanding and sealing a cut edge
- Five ways to terminate a run of panels
- Joins between panels
- Tools and materials for a tidy edge
- Perspective: the best edge is the one you planned
- A renter’s edge checklist
- Where DwellForms™ fits
- FAQ
- Sources
Why the edge decides how the wall looks
The face of a panel is designed. The edge is where it meets the real world: a ceiling line, a door frame, a skirting board, a neighbouring panel, a corner that is never quite square. In New Zealand homes, where walls are often older, slightly out of plumb and sometimes textured, that meeting point is where small imperfections become visible.
There are really two problems hiding in the phrase “finish panel edges”. The first is the cut edge: the raw face you create when you trim a panel to size. The second is the termination: how the whole run of panels ends against something else. Treat them separately and the job becomes manageable.
If you are still choosing a material, our guide to decorative wall panels compares the main options before you commit to cutting anything.
Start with the cut: preparation and technique
Most edge problems are made at the saw, not at the trim stage. EQUITONE’s New Zealand installation guide, written for rigid fibre cement facade and interior panels, is a useful benchmark for what careful cutting looks like, even if your panels are a different material. It recommends supporting the panel fully on a clean, soft-covered workbench, holding it firmly to prevent vibration and cutting one panel at a time. The same guide suggests setting a portable saw blade to extend about 5 mm below the panel, and trial-cutting waste material first to find the best setting and feed speed.
Those habits translate to almost any panel:
- Support the whole sheet. An overhanging offcut flexes as the blade finishes the cut, and that is where chips and tear-out happen.
- Protect the face. Rest the panel on a soft surface so the decorative side is not scratched or marked.
- Cut one at a time. Stacking panels to save minutes costs you accuracy on the lower sheets.
- Test on waste. A scrap offcut tells you whether your blade, speed and feed are right before the visible panel is committed.
- Mark twice, cut once. Measure the opening at the top, middle and bottom. Walls are rarely uniform.
Curves and cut-outs
Internal cut-outs for switches, vents or power points need a different approach. For curved cut-outs, the same guide says to place the panel face down on soft coverage, drill a hole at the edge of the intended cut-out, switch off the jigsaw pendulum function and use the specified jigsaw blade. Turning the pendulum action off matters because it makes the blade bite aggressively on the upstroke, which is what lifts the surface edge.
For curved walls rather than curved cuts, see how to fit panels on curved walls without drilling.
Sanding and sealing a cut edge
A freshly cut edge, especially on a rigid board, is rough and absorbent. Two steps turn it into a finished one.
Sand it square
EQUITONE recommends sanding the cut edge with 80-grit paper fixed to a hard timber block of roughly 400 × 100 mm. The block is the important part. The same guide warns that unsupported sandpaper, sanding pads or sponge blocks can round or distort the edge. A rounded edge reads as sloppy once light rakes across the wall, because the shadow line is no longer crisp.

Keep the block flat against the edge and use long, even strokes rather than short scrubbing ones. Stop as soon as the saw marks are gone.
Clear the dust, avoid burning
Dust left in the surface texture shows up as a pale haze later. EQUITONE advises removing cutting dust immediately with a clean, dry microfibre cloth. It also warns that poorly maintained tools or incorrect speed can burn edges, and that grinders should be avoided because they create excessive speed, pressure and dust. If you see scorching on a trial cut, the cause is almost always a dull blade or a feed that is too slow.
Seal where the maker says to
Sealing is material-specific, so follow the manufacturer. For its own board range, EQUITONE specifies LUKO sealer on cut edges of its natura and natura PRO panels to help prevent moisture ingress, and notes LUKO can also be used on pictura panels to help prevent whitening. Do not assume another brand needs, or tolerates, the same product. Check the data sheet for your panel before you apply anything to a cut face.
If your panels are interior and moisture is not a concern, the question is simply whether the raw edge will be visible. If it will, finish it. If it will sit inside a trim or against a corner, a clean cut is usually enough.
Five ways to terminate a run of panels
Once the cut edge is clean, decide how the wall ends. Each method suits a different look and a different level of permanence.
| Method | Look | Best for | Renter-friendly? |
|---|---|---|---|
| Run to the wall edge | Seamless, architectural | Walls where the panel field fills the space | Yes, nothing added |
| Small, consistent reveal gap | Shadowed, deliberate | Ceilings, skirting, door frames | Yes |
| End strip or edge trim | Neat, protective | High-traffic spots, exposed ends | Depends on how it is fixed |
| Return around a corner | Wrapped, sculptural | External corners | Usually needs planning |
| Frame with paint or a border | Gallery-like | Panels as a single feature | Paint is not renter-friendly |
Run to the edge
The cleanest finish is no finish at all: the panel field simply ends where the wall does. This needs accurate measuring, but it avoids the visual noise of trim. It is also the approach we suggest first for rental walls, because there is nothing extra to remove at the end of the tenancy.
A reveal gap
Leaving a small, even gap between the panels and the ceiling or skirting hides the fact that neither is perfectly straight. A 3 mm gap that is consistent looks intentional. A 3 mm gap that tapers to zero looks like a mistake. Use a spacer, such as a folded card or a flat offcut, to hold the gap steady as you work along the wall.
End strips and trims
On many wall cladding systems, an end strip covers the exposed edge and protects it from knocks. Where panels are fixed permanently, these strips are screwed or glued. In a rental, that is the point where you should stop and think, because fixing an edge trim may mean a hole or a stubborn adhesive. If you need an end cap, choose a lightweight option and fix it only with the same removable approach you used for the panels.
Returns and external corners
External corners are the most exposed edge in any room, the part that gets bumped by furniture, bags and vacuum cleaners. Rigid panel systems often use an aluminium or timber corner profile to take that impact. With a removable felt system, the better answer is usually to end the run just before the corner, or to plan the layout so the corner falls between panels instead of through one.
We have written a dedicated guide on no-drill wall panel corners for renters, covering a 1 to 2 mm gap and a 20 mm V groove approach for turning corners neatly.
Framing with colour
Painting a border or the surrounding wall can make a panel field look framed and finished. It is also the one option on this list that is not renter-friendly, so treat it as a homeowner choice.
Joins between panels
A join is just an edge facing another edge, so the same rules apply. Cut both edges the same way, check they are square, and keep the gap consistent. A gap of 1 to 2 mm is easier to live with than a hairline fit, because it absorbs small cutting errors and the slight movement of a wall.
Lay the run out on the floor first, in the order it will go on the wall, and look at it from standing height. Joins that look fine on a bench can read very differently once light rakes across them. If you are building a pattern across several panels, mark each panel lightly on the back so you can restore the sequence when you lift it into place.
Textured walls add another variable: the surface is not flat, so edges can look as if they float. Our guide to fitting panels on textured walls sets out three no-drill approaches.
Tools and materials for a tidy edge
You do not need a workshop. For a typical panel edge job, gather:
- A sharp blade suited to the panel material, replaced when it starts to drag or burn
- A steel rule and a square, so every cut is measured from a true line
- Soft covering for the bench, such as an old blanket or carpet offcut
- A sanding block, with 80-grit paper fixed to a hard timber block, if you are working with rigid board
- A clean, dry microfibre cloth for dust
- A sealer, only if your panel manufacturer specifies one
- Spacers for gaps, and low-tack tape for marking
If your panels are felt, a sharp blade and a firm straightedge matter far more than power tools. Felt compresses under a dull blade, which leaves a fuzzy, uneven edge. Replace blades often and cut on a self-healing mat or a firm board.
Perspective: the best edge is the one you planned
We design DwellForms™ for people who cannot, or would rather not, change their walls. That shapes how we think about edges. A kit is made from precision-cut PET felt, so the panels are designed to sit together as a considered arrangement rather than as raw board waiting to be trimmed. The craft is in the layout.
So our advice is to resist the instinct to cut first. Measure the wall, then choose a layout that ends where you want it to end. If the run is a little short or long, an extension pack lets you adjust the field rather than butchering a panel at the last moment. Our guide on extending wall panels without drilling explains how.
The second part of our thinking is adhesion. We fix panels with nano-adhesive pads. We tested several pull-tab and adhesive options, and deliberately discounted one very popular brand because the pads we selected performed significantly better in our own testing at minimising damage to walls. That is a claim about our tests, not a promise: no adhesive is completely damage-proof, and results depend on the paint, the surface and how the pads are removed. Test a small area, press firmly, and when it is time to go, follow our steps for removing adhesive wall panels without wrecking the wall.
We also believe colour belongs on rental walls. A crisp edge is what makes a bold colour look sophisticated instead of busy. It pulls a room out of the safe, polite middle, and it should do so without costing you your bond.
— Michelle
A renter’s edge checklist
Before you press a single panel to the wall, run through these questions.
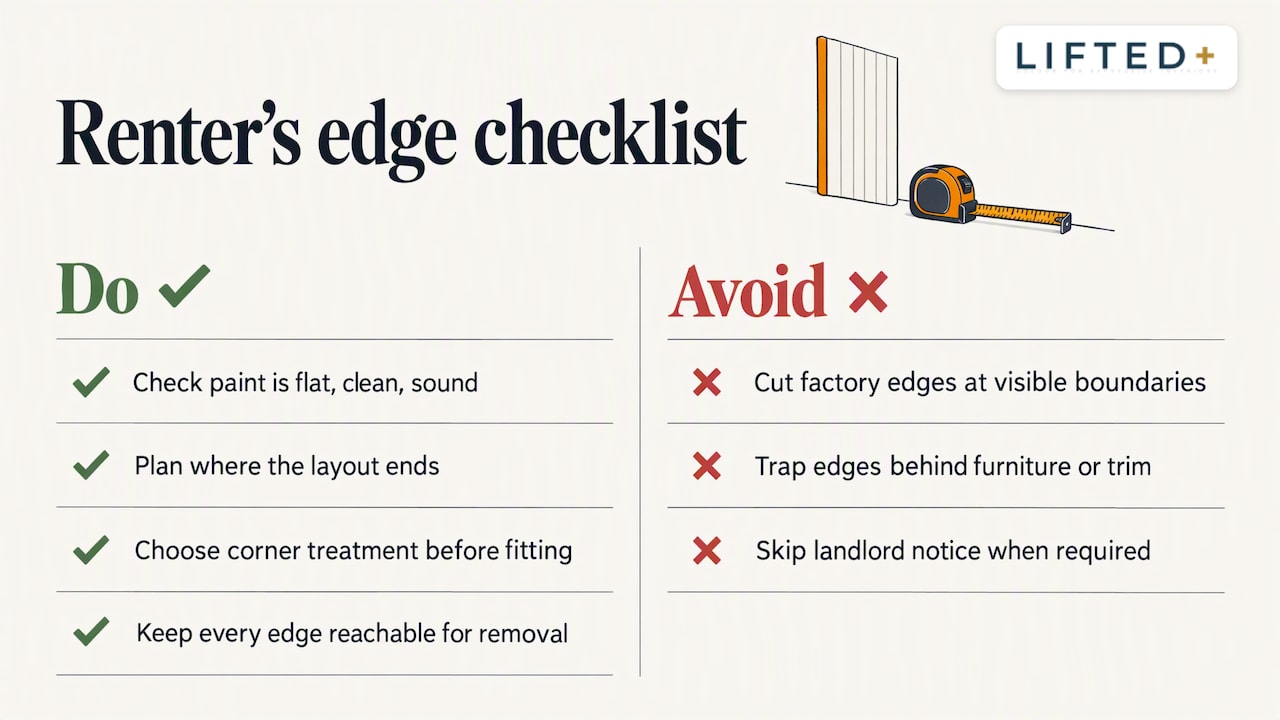
Is the wall surface suitable? Flat, clean, sound paint is ideal. Flaking paint, crumbly plaster or a very rough texture needs extra care, and some walls are simply not suitable.
Does the layout end where the wall ends? Aim to avoid cutting. If you must cut, cut an inside panel and keep the factory edges at the visible boundary of the wall.
Have you planned the corners? Decide whether you are stopping short, leaving a V groove or wrapping a return before the first panel goes up.
Can you reach every edge to remove it later? An edge that is stuck behind furniture or fixed under a trim is hard to release without pulling paint.
Have you read your tenancy agreement? Landlord limits vary. Even with a removable system, tell your landlord what you intend to do if your agreement asks you to.
Where DwellForms™ fits
If you want a feature wall with finished edges and none of the saw work, start with a DwellForms™ Core Kit, then add an extension kit if your wall is wider than the base layout. Not sure of your palette? Colour samples let you see the shades against your own light and walls first, and the sample purchase is credited towards a full kit order.
For a sense of the material itself, read what PET felt is and how it behaves.
FAQ
What is the best way to finish the cut edge of a panel?
Cut cleanly with a sharp, suitable blade and full support, then sand a rigid board edge with 80-grit paper on a hard timber block so the edge stays square. Wipe the dust off with a dry microfibre cloth. If the manufacturer specifies a sealer for cut edges, apply it. Felt panels need a sharp blade and a firm straightedge rather than sanding.
Do I need edge trim on every panel wall?
No. Trim protects exposed edges and hides imperfect cuts, but many walls look best when the panels run to the wall edge or finish with a small, even gap. Trim matters most on external corners and in places that get knocked. In a rental, avoid any trim that needs drilling or strong adhesive.
How do I finish an external corner without drilling?
Plan the layout so the run stops just short of the corner, or so the corner falls on a join rather than through a panel. Our guide to no-drill corners for renters describes a 1 to 2 mm gap and a 20 mm V groove method. Avoid forcing panels tight into the corner.
Can I finish panel edges on a textured wall?
Yes, but textured walls make edges look uneven because the panel cannot sit fully flat. Choose a fixing method suited to the texture, press firmly and check the edges under raking light before you commit to the whole run. Some surfaces are not suitable, so test a small area first.
Sources
Recommended
- No Drill Wall Panel Corners For Renters: 1–2mm Gap, 20mm V Groove
- Panels Around Switches: A Clean, No-Drill Approach
- Getting Panels On Curved Walls Right Without A Single Drill Hole
- No Drill: 3 Ways To Fit Panels On Textured Walls For Renters
This article is for general information and inspiration only. Product performance and results may vary depending on individual circumstances, surfaces and installation.
