

Crooked seams rarely come from the panels. They come from a first panel placed a few millimetres off, a wall that is not as square as it looks, and a gap that drifts by a hair with every piece. The fix is the same each time: plan the layout on the floor, mark one true starting line, fit in order, and check every panel before you press it home. This guide shows how to do that on a renter-friendly feature wall, and how to correct a seam that has already wandered.
Key Takeaways
- Alignment is decided before the first panel goes up: measure the wall, dry-lay the pattern on the floor and mark a plumb starting line.
- Even seams are about consistent spacing, so pick one gap and hold it across the whole wall with a simple spacer.
- Walls and corners are rarely perfectly square, so let the first line be true and let the edges absorb the difference.
- Caulk and filler hide a gap but do not fix a drifting seam. Reposition the panel instead.
- With removable, no-drill panels, a misaligned piece can usually be lifted and refitted, which makes patience cheap.
Table of Contents
- Why seams go wrong in the first place
- Measure and check before you touch a panel
- Dry-lay the pattern on the floor
- Choose your gap and keep it
- Mark one true starting line
- Fit the panels in order
- Corners, curves and awkward spots
- How to fix seams that are already crooked
- Hiding a gap is not the same as aligning a seam
- Tools that make straight seams easy
- Our point of view
- Ready to build your wall
- FAQ
- Sources
Why seams go wrong in the first place
A feature wall asks the eye to follow lines. On a plain wall you might never notice a 3mm lean. Once a pattern of panels repeats that lean across a metre of wall, it reads as a mistake from across the room.
There are three usual culprits. The first is trusting the room: ceilings sag, skirting runs off level, and corners are seldom a true 90 degrees. The second is starting at the wrong place, typically tight against a corner or the ceiling, so every later panel inherits the room’s flaws. The third is spacing by eye. Gaps feel even while you work and look uneven once you step back.
None of this is a skills problem. It is a sequencing problem, and sequencing is something you can fix with a pencil, a level and an evening.
Measure and check before you touch a panel
Before anything is fixed to the wall, answer five questions.
How wide and tall is the wall, measured at the top, middle and bottom? If the three widths differ, you have an out-of-square wall, and you should know that now.
Where are the obstacles? Switches, power points, window reveals, door frames and light fittings all interrupt a grid. Mark them on a sketch with their distances from the corner and the floor.
What is the surface? Smooth, well-painted plasterboard behaves differently from a textured or dusty wall. Our guides on panels on plasterboard and on fitting panels to textured walls explain what to look for. Adhesive pads need a clean, dry, sound surface, and no adhesive suits every wall.
Is the paint sound? Flaking or chalky paint can let go, taking a panel out of line with it, so test a small area first.
Where will the eye land? Furniture, a window or a bed head decides where the pattern should feel centred. Aligned seams matter most at eye level, so prioritise that zone.
Dry-lay the pattern on the floor
The most useful hour you will spend is on the floor. Lay the panels out in the order you plan to fit them, using the same gaps you want on the wall. Photograph it. If you are working from a kit, keep the layout guide beside you and check the sequence against it.
Dry-laying shows you three things at once: whether the pattern suits the wall’s proportions, where the cut or partial pieces fall, and whether the colour balance feels right. If a darker shade clumps in one corner, shuffle now rather than peel later. If you are still choosing colours, colour samples let you hold the shades against your own light before you commit. Our guide to mixing colours in interiors helps with the balance.
If you are comparing different panel approaches before choosing, the broader decorative wall panels guide sets out the options, and this overview of decorative wall panels covers other panel styles you may meet.
Choose your gap and keep it
A seam looks aligned when the gap is consistent, not when it is zero. Decide on one spacing and stick to it.
For reference, professional cladding works to the same logic. Installation guidance for large facade panels in New Zealand recommends a 10mm joint, with 8mm to 12mm acceptable as installation tolerance. That is a different product on a different scale, but the principle carries over: choose a nominal joint, define the tolerance, and keep inside it. For interior felt panels the gap is much smaller, and the right figure comes from your kit’s instructions. Our corner guide, no-drill wall panel corners for renters, sets out the 1–2mm gap and 20mm V groove we use at corners.
Make a spacer. A strip of card cut to your gap width, or a small offcut, slid between neighbouring panels, removes the guesswork. Check it at the top, middle and bottom of every seam rather than only at the top.
Mark one true starting line
Every seam on the wall derives from your first line, so make it honest.
- Decide where the pattern is anchored. For most feature walls that is the centre, or the edge nearest the focal point such as a bed head or sofa.
- Use a spirit level or a laser line to draw a faint vertical pencil line at that position. Do not measure from the corner and assume it is plumb.
- Draw a horizontal reference at the height of the first row, again checked with a level.
- Step back and check both lines against the wall from a few metres away. Adjust now if something looks off.
If the ceiling or skirting is out of level, you will notice that the pattern’s first row does not run parallel to it. That is correct. Your eye forgives a wall that is slightly off the ceiling far more than a pattern that tilts against itself. If the offset is large, fit the first row level and let a slim gap against the ceiling or skirting take up the difference.
A tip worth borrowing from wallpapering: wallcoverings are not usually overlapped at corners except in special situations, because most corners are not built perfectly square. The lesson for panels is the same. Do not drag a straight pattern into a crooked corner. Keep the pattern true and let the edge absorb the irregularity.
Fit the panels in order
With your lines drawn and the layout photographed, work in a calm, repeatable rhythm.
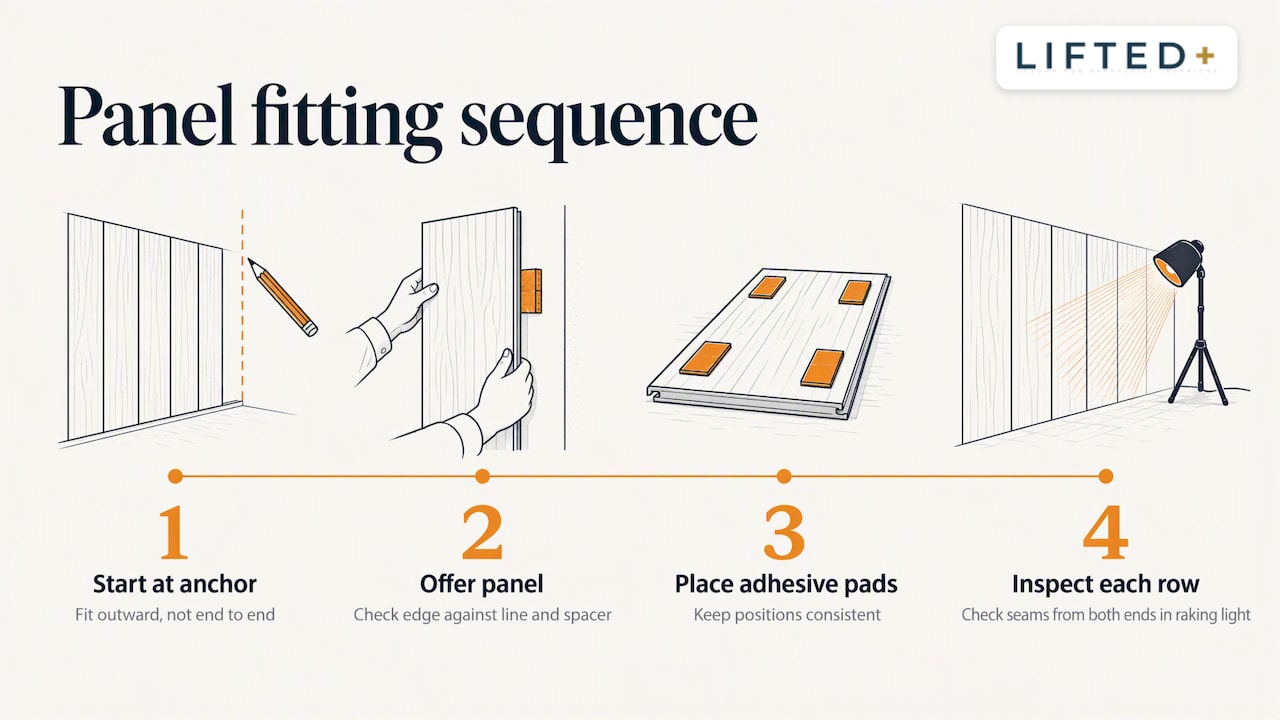
Start at the anchor point and fit outward, not from one end to the other, so errors do not accumulate in one direction. Offer each panel up without pressing it fully. Check its edge against your pencil line and your spacer, then press once it is right.
Place adhesive pads where your kit instructions say, and keep their positions consistent so each panel sits flat and parallel to the wall. A panel that sits proud on one corner will look misaligned even when its edge is on the line.
After every row, stop. Step back. Look along the seams from both ends, and from a low angle with a lamp beside you. Raking light exaggerates tiny errors, so it is worth checking while they are easy to fix.
Work patiently. Rushing is the quickest way to pull a seam off true. If you are fitting extensions later, extending wall panels without drilling covers how to keep the new section matched to the original.
Corners, curves and awkward spots
Corners are where alignment goes to die. Fit the last full panel before the corner true to your line, then measure the remaining gap at several heights. If it varies, you are looking at an out-of-square corner, and the panel that turns the corner should be placed to look even, not to match the wall mathematically.
Curved walls change the problem again, since panels need to follow the arc without the seams fanning out. Our guide to fitting panels on curved walls addresses this directly.
Around switches and power points, mark the cut-out on the panel before fitting, and leave the cover plate off until the panel is placed. Always turn off and avoid working near live electrical fittings, and call a licensed electrician if a fitting needs to be moved.
How to fix seams that are already crooked
The good news with a removable system is that a wrong panel is not a final decision. Here is how to correct the common faults.
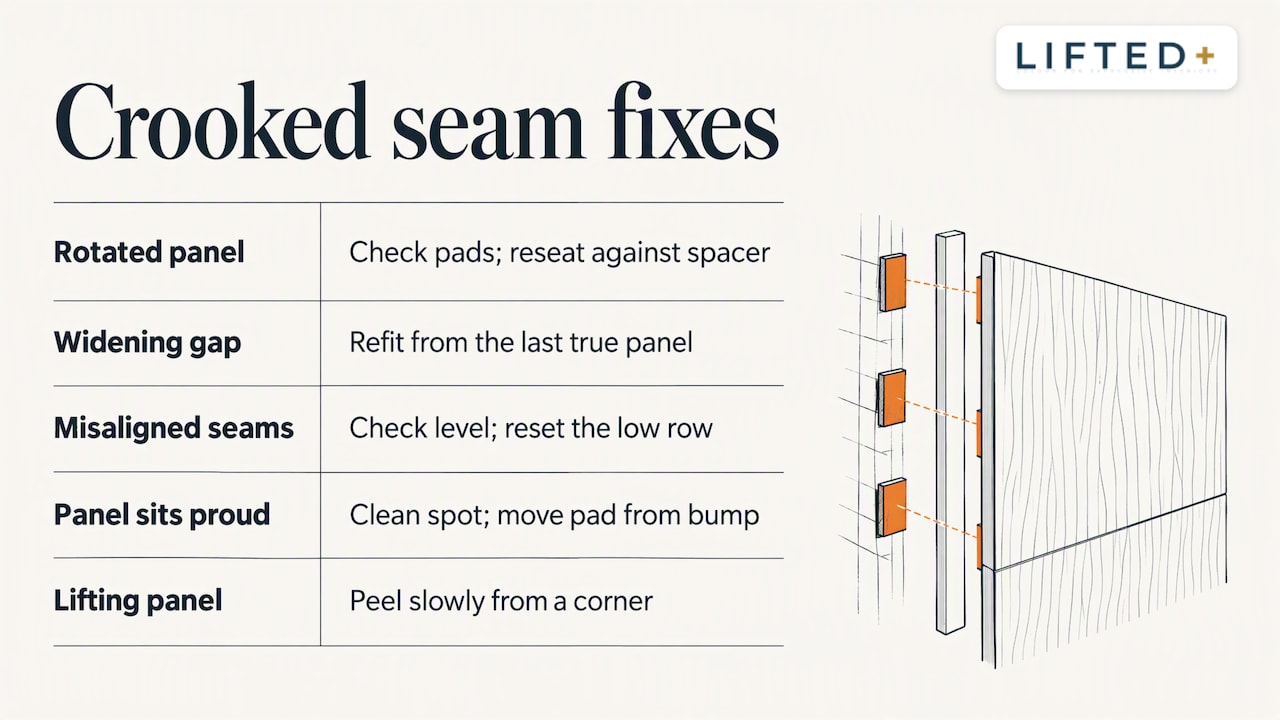
One panel is slightly rotated. Lift it, check the pad positions, and re-seat it against your spacer. Rotation usually comes from pressing one edge first.
The gap widens gradually along a row. The row has drifted. Work back to the last panel that sat exactly on your line, lift the ones beyond it, and refit them one at a time with the spacer. Do not try to correct drift by shifting every panel by a hair, because that spreads the error instead of removing it.
Vertical seams do not line up between rows. Check that the horizontal reference you drew was level, then compare each row against it. If a row sits low on one side, lift and reset that row.
A panel will not sit flat. Dust, texture or a pad placed over a bump may be the cause. Clean the spot, move the pad slightly and try again. If the wall surface is the problem, our notes on textured walls will help.
When lifting a panel, take it slowly and peel from a corner rather than yanking. Our tested adhesive pads are chosen to keep wall damage to a minimum, but no adhesive is completely damage-proof, so go gently, particularly on older or thin paint.
Hiding a gap is not the same as aligning a seam
Search for this topic and most results are about hiding joins, usually by running caulk along a seam in shiplap or timber panelling. That is a repair for fixed, painted cladding, and it has a place there. If you are fitting timber boards, our shiplap wall panels guide covers that world.
For removable felt panels it is the wrong move. Sealant and filler lock a seam in place, which defeats the point of a wall treatment you can lift, rearrange and take with you. Even in professional cladding, installers are cautioned that sealing joints with sealant may deteriorate over time, causing staining and maintenance issues.
So treat a visible gap as a signal. Either the spacing has drifted, or the wall has a quirk to accommodate. Reposition the panel, and you will find the seam straightens without any product at all.
Tools that make straight seams easy
You do not need much, and most of it is already in a household drawer.
A spirit level at least 600mm long, or a laser line, for the guide lines. A soft pencil, because it wipes off a painted wall far more easily than a pen. A tape measure and a card spacer. Masking tape to temporarily hold a panel while you step back. A stepladder so you can check the top edge at eye level instead of guessing from the floor.
A second pair of eyes is more useful than any tool. Ask someone to stand at the far side of the room and call out whether a panel looks level while you hold it. It takes thirty seconds and spares an hour of correction.
Our point of view
Straight seams are a calm kind of satisfaction. A wall of colour and shape looks deliberate when its lines are crisp, and it looks accidental when they are not. The difference is rarely talent. It is planning.
We designed DwellForms™ for people who want colour without commitment, so the thing we care about most is that you can fix a mistake. Panels that lift and refit, held by tested adhesive pads instead of screws, mean the first attempt does not have to be perfect. You can place, step back, and adjust.
Our advice is always the same: spend your effort on the first line and the gap, not on the speed of fitting. Draw the line, hold the spacing and judge it with raking light. Then enjoy the wall, because texture without renovation should feel like a pleasure, not an exam.
We are also honest that no wall is identical to another. Older paint, textured finishes and out-of-square corners all change the result, and we would rather you test a small area first than assume.
Michelle
Ready to build your wall
If you have a blank wall and a head full of colour, start with a DwellForms™ Core Kit. It is a renter-friendly feature wall: no drilling, no paint, no permanent change, and panels you can rearrange or take to your next home.

Not sure which shades suit your light? Order colour samples first, and the cost is credited towards a full kit. When you want to grow the design later, extension kits let you add to the wall, and our Change It Later page explains how the system adapts.
FAQ
How do I keep wall panel seams straight?
Draw a plumb starting line with a level, fit outward from that line, and use a card spacer to hold one consistent gap. Check each row from a distance before moving to the next. Straight seams come from checking as you go, not from fixing at the end.
Should panel seams touch or have a gap?
Follow your kit’s instructions, because the right spacing depends on the product. For a pattern of separate panels, a small consistent gap usually looks cleaner than a tight join, since it hides tiny edge variations. What matters most is that the gap is the same everywhere.
What if my wall or corner is not square?
That is normal in many homes. Keep your pattern true to a level and plumb line and let the final panel or the edge take up the difference. Measure the corner at several heights so you know how much it varies before you cut or place anything.
Can I fix a crooked panel without damaging the wall?
Often, yes, since removable panels are designed to be lifted and refitted. Peel slowly from a corner and re-seat the panel against your line. No adhesive is completely damage-proof, so test a small area first, particularly on older or thin paint.
Sources
- EQUITONE design and installation guide, New Zealand
- Resene: how to fix peaking joins when wallpapering
- Decorative wall panels: a complete homeowner’s guide
Recommended
- Getting Panels On Curved Walls Right Without A Single Drill Hole
- No Drill Wall Panel Corners For Renters: 1–2mm Gap, 20mm V Groove
- How To Finish Panel Edges For A Clean, Considered Look
- Extend Wall Panels Without Drilling: Renter Safe DwellForms™ Kits
This article is for general information and inspiration only. Product performance and results may vary depending on individual circumstances, surfaces and installation.
