

The best removable wall panel ideas for renters right now are: peel-and-stick tiles, peel-and-stick slat strips, slim MDF picture-frame moulding applied with removable strips, PET felt modular panels (DwellForms™), lightweight 3D foam panels, and faux-brick or faux-stone adhesive panels. Every one of these works without drilling, leaves minimal trace on a rental wall, and can be installed in an afternoon.
- Peel-and-stick tiles — self-adhesive, repositionable, and available in geometric and subway patterns; ideal for kitchen splashbacks and bathroom feature zones.
- Peel-and-stick slat strips — thin timber-look or PVC strips that stack vertically to mimic a full slat wall; no tools beyond a level and a tape measure.
- Slim MDF picture-frame moulding — applied with Command strips or equivalent removable adhesive; creates a classic panelled look in bedrooms and hallways.
- PET felt modular panels (DwellForms™) — precision-cut, colour-led panels mounted with tested adhesive pads; designed specifically for NZ renters who want sculptural texture and bold colour without paint or drilling.
- Lightweight 3D foam panels — ultra-light, self-adhesive, and available in brick, wave, and geometric profiles; low cost and easy to cut to fit.
- Faux-brick and faux-stone adhesive panels — convincing material mimicry at a fraction of the weight; suited to media walls and bedroom headboard zones.
Pro Tip: Before ordering a full kit, check your tenancy agreement for any clause about wall fixings or adhesives. Then test your chosen adhesive on a small, hidden patch of wall for 48 hours. Both steps protect your bond and your confidence.
Key takeaways
Removable wall panels are the most practical way for NZ renters to add colour, texture, and design impact without drilling, painting, or risking their bond.
| Point | Details |
|---|---|
| Choose by room first | Match panel material to room conditions: moisture-rated for wet zones, PET felt or cork for bedrooms and offices. |
| Test before committing | Use a sample kit or adhesive patch test on a hidden wall area before installing a full feature wall. |
| Follow cure times | Allow 24–72 hours of adhesive cure time before loading panels; skipping this step causes most adhesion failures. |
| Budget realistically | NZ costs range from roughly NZD $55–$145 for foam tiles to NZD — for a PET felt modular kit on a 3.6 m² wall. |
| DwellForms™ for renters | Liftedplus’s DwellForms™ kits use tested adhesive pads, 100% recycled PET felt, and modular extension packs designed for NZ rental walls. |
Table of Contents
- What does each removable panel type look like?
- How do you install and remove panels without damaging your walls?
- What does a removable panel project cost in New Zealand?
- What are the 2026 design trends for removable wall panels?
- What should you avoid when installing removable panels?
- How do you choose the right removable panel for your room?
- Why do PET felt modular panels work so well for renters?
- DwellForms™ wall kits: colour and texture without the renovation
- Sources
- FAQ
What does each removable panel type look like?
Choosing the right panel comes down to the look you want and the wall you have. Here is a quick guide to each type.
Peel-and-stick tiles are flat, often ceramic-look or geometric, and suit kitchens, bathrooms, and laundries where a clean, tiled finish reads as intentional rather than temporary. They install in minutes and peel away cleanly from smooth, sealed surfaces. The limitation is scale: they work best as accents rather than full feature walls.
Peel-and-stick slat strips deliver the vertical rhythm of a full timber slat wall without the weight or the commitment. Stacked floor to ceiling, they add height to low rooms and suit Scandi, coastal, and modern-luxe aesthetics. Thickness is worth noting: most slat strips sit 10–15 mm proud of the wall, which can affect skirting clearance and door swings in tight hallways.
Slim MDF picture-frame moulding creates a Georgian or neo-deco panelled look using removable adhesive strips. Painted MDF is a strong all-round choice for dry rooms like bedrooms and living rooms, where moisture is not a concern. The look is architectural and considered; the install is patient work rather than quick.
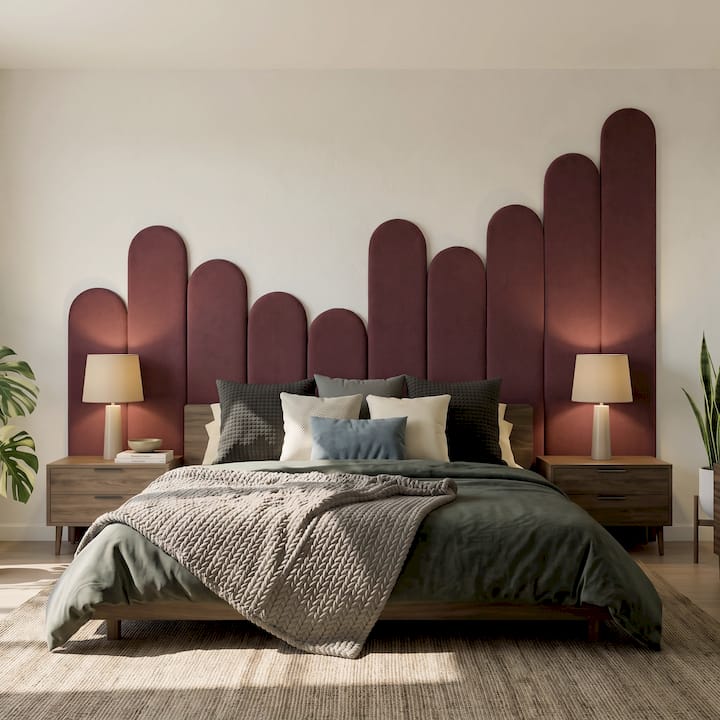
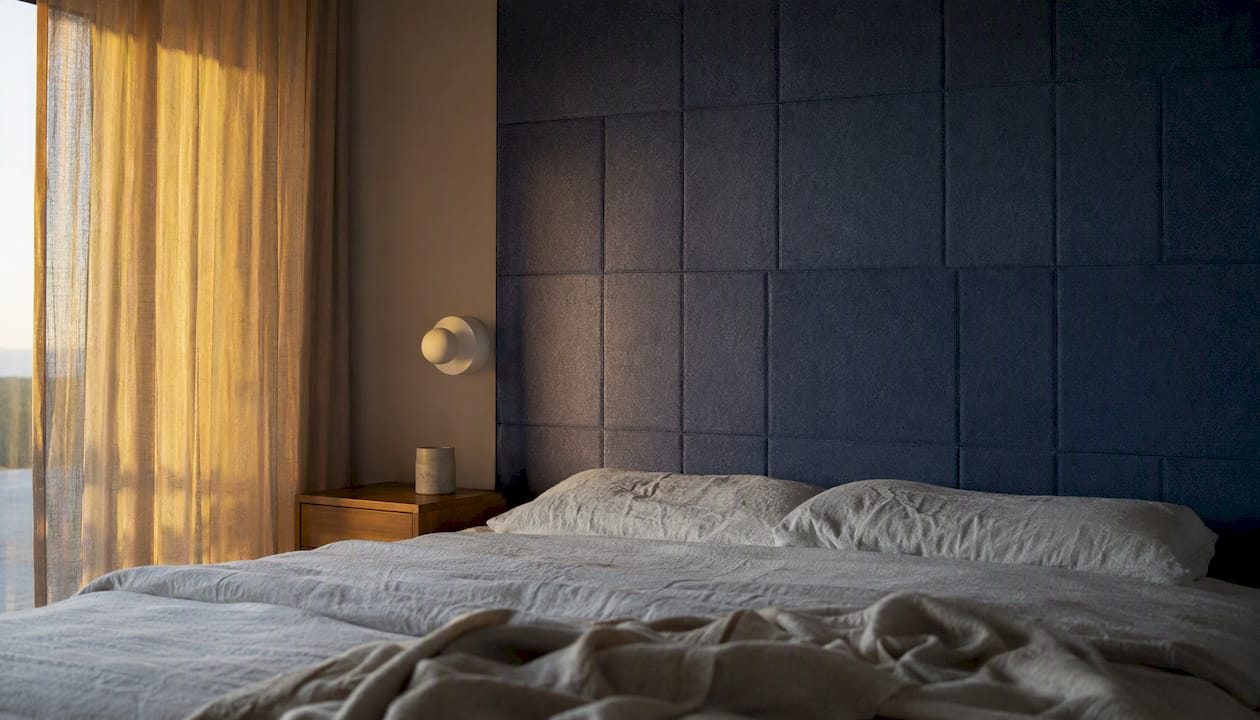
PET felt modular panels are where texture and colour converge. The felt surface absorbs light rather than reflecting it, giving walls a warmth that paint simply cannot replicate. They suit bedrooms, home offices, and living rooms, and the modular format means you can rearrange or extend the layout as your space evolves.
Cork tiles bring a warm, organic texture and a quiet, earthy tone. They suit home offices and reading nooks, and their natural surface takes pins without damage. Moisture resistance varies by product; avoid unfinished cork in bathrooms.
Lightweight 3D foam panels are the budget entry point. They are self-adhesive, cuttable with a craft knife, and available in brick, wave, and diamond profiles. Visual impact is high for the price, though the foam surface can dent under pressure and does not carry the tactile quality of felt or timber.
Faux-brick and faux-stone panels let renters achieve the look of permanent materials with lightweight, cuttable panels and minimal tools. A faux-stone media wall or a faux-brick bedroom headboard reads as deliberate and designed. Weight is still worth checking: heavier faux panels may need more adhesive points than lighter foam alternatives.
Beadboard and board-and-batten alternatives use modular PVC or MDF strips to mimic classic joinery. They suit farmhouse, coastal, and transitional interiors, and pair naturally with interior panel doors for a cohesive whole-room feel.
Pro Tip: For any panel thicker than 12 mm, check the clearance around skirting boards, power points, and door architraves before you commit to a layout. A quick cardboard mock-up saves a lot of rework.
2026 trend note: Slim vertical slats and tactile PET felt are two of the strongest 2026 panel trends for rental settings — both deliver high perceived value while staying lightweight and straightforward to install.
How do you install and remove panels without damaging your walls?
The safest renter approach is to use manufacturer-tested adhesive pads or a modular no-drill system like DwellForms™, test on a hidden patch first, follow the cure time exactly, and remove slowly at a low angle. Concealed clip systems offer another route for heavier panels, enabling removal and reinstallation without touching the wall finish.
Installation steps
- Clean the wall surface. Wipe with a damp cloth and allow to dry fully. Dust, grease, or moisture will compromise adhesion.
- Acclimatise your panels. Leave panels in the room for at least 24 hours before installing. Skipping this step is one of the most common installation mistakes and can cause warping or poor adhesion.
- Measure and mark. Use a spirit level and pencil to mark your starting line. A crooked first row compounds across every panel above it.
- Dry-fit before committing. Lay out the full arrangement on the floor first. Adjust spacing and trim edge pieces before any adhesive touches the wall.
- Apply adhesive pads. Follow the manufacturer’s placement guide exactly. Press each panel firmly for the recommended time.
- Allow full cure time. Most tested adhesive pads need 24–72 hours to reach full bond strength. Avoid touching or loading the panels during this period.
- Finish edges. Use trim strips or leave a deliberate reveal at skirting and ceiling lines for a clean, architectural finish.
Removal steps
- Warm the adhesive. Use a hair dryer on a low heat setting to soften the bond before pulling.
- Peel at a low angle. Pull slowly and steadily at roughly 15–20 degrees to the wall surface. Sharp angles increase the risk of paint lifting.
- Remove residue. Use a soft scraper and a gentle solvent (isopropyl alcohol works on most painted surfaces) to lift any adhesive residue.
- Inspect and patch. Check for any paint transfer. Small touch-ups with a matching paint pen or filler are usually straightforward on standard rental walls.
Tools you will need: spirit level, tape measure, pencil, hair dryer or heat gun (low setting), soft plastic scraper, isopropyl alcohol, microfibre cloth.
Pro Tip: Photograph your wall before installation and again immediately after removal. Date-stamped photos are your clearest evidence in any bond conversation with a landlord. Store your panels flat with their adhesive pads protected by release paper so they are ready for your next home.
What does a removable panel project cost in New Zealand?
Removable wall panels in New Zealand range from roughly NZD $15–$40 per m² for budget foam or peel-and-stick tiles, NZD $60–$120 per m² for mid-range slat strips and cork, and NZD $120–$250+ per m² for premium PET felt modular kits and architectural panel systems. A standard feature wall of approximately 1.5 m x 2.4 m (3.6 m²) sits comfortably within a weekend DIY budget for most panel types. For detailed NZ-specific cost bands and sample-kit pricing, Liftedplus’s renter-friendly cost guide is a practical starting point.
Factors that shift cost include custom colour selection, delivery to regional NZ addresses, and whether you purchase a sample kit first. Sample kits are typically credited toward a full kit purchase, so the upfront outlay is not wasted.
A single-person afternoon is realistic for foam tiles or slat strips on a small wall. A living-room feature wall in PET felt modular panels suits a two-person, 2–4 hour install, with the bulk of the time spent on dry-fitting and layout.
What are the 2026 design trends for removable wall panels?
The leading directions for 2026 are colour-led panels, vertical slat profiles for added height, slim architectural forms, tactile PET felt surfaces, and moody painted-effect feature panels that deliver depth without a single brush stroke.
- Vertical lines for low ceilings. Slim vertical slats draw the eye upward and make standard 2.4 m rental ceilings feel taller. Decorative options including vertical slats, 3D panels, cork and vinyl all deliver visual texture while staying lightweight enough for temporary installs.
- Two-tone half-height panelling. A panel arrangement that runs to chair-rail height, with a contrasting wall colour above, creates a layered, considered look without full-wall commitment.
- LED backlighting behind modular panels. Strip lighting tucked behind a PET felt or slat panel adds depth and warmth, turning a feature wall into something closer to a sculptural installation.
- Sculptural grid layouts. Geometric arrangements of modular panels, particularly in felt, create rhythm and shadow play that shifts through the day as light moves across the room.
- Bold, saturated colour. Terracotta, deep teal, warm sage, and charcoal are the palette directions for 2026. Removable panels let you commit to a colour without the permanence of paint.
Room-specific ideas:
Bedroom headboard wall. A grid of PET felt panels in a warm terracotta or deep sage behind the bed creates a soft, architectural headboard effect. No frame, no drilling, no paint.
Media wall. Faux-stone or vertical slat panels behind a TV anchor the room and give the screen a deliberate backdrop. Pair with LED strip lighting for evening depth.
Hallway statement. A half-height panel arrangement in a bold colour transforms a narrow hallway from a corridor into a considered space. Slim profiles keep the clearance generous.
Home office Zoom background. A modular felt panel arrangement in a muted, textured tone reads as professional and considered on camera. It also softens the acoustics of a hard-walled room without making acoustic claims.
Choosing a bold colour in a rental is easier with a sample kit. Order a few colour samples, live with them on the wall for a few days, and let the light in your specific room make the decision.
What should you avoid when installing removable panels?
The top risks are adhesive on delicate or textured wallpaper, high-humidity zones without moisture-rated panels, and attempting to hang heavy fixtures from panels that are only adhesive-mounted.
Surfaces and conditions to avoid or treat carefully:
- Loose or flaking plaster — adhesive will pull the plaster away, not the panel.
- Polystyrene or heavily textured paint finishes — contact area is too low for reliable adhesion.
- Unpainted or unfinished timber — adhesive bonds inconsistently and can stain the timber.
- High-moisture bathrooms and laundries — use only moisture-rated panels and adhesives in these zones.
- Wallpapered walls — most adhesives will damage wallpaper on removal; get written landlord permission before proceeding.
Landlord and tenancy considerations:
- Read your tenancy agreement in full before purchasing any panel system. Look for clauses about wall fixings, adhesives, and alterations.
- If the agreement is ambiguous, contact your landlord or property manager in writing and ask for explicit permission. Keep the reply.
- Offer to demonstrate the adhesive on a small, hidden patch and show the removal process. Most landlords respond well to a proactive, evidence-based approach.
- Prepare a simple repair plan: note the wall paint colour and finish so you can touch up if needed.
When no-drill adhesive is not the right answer:
If your walls have a textured or specialist finish, if the panel system is heavier than the adhesive rating supports, or if your lease explicitly prohibits any wall adhesives, consider freestanding panel systems or large-format art leaning against the wall instead. A no-drill wall decor approach does not always mean adhesive; sometimes it means rethinking the format entirely.
How do you choose the right removable panel for your room?
Choose by room use first, then wall surface, then the look you want. A bathroom needs moisture-rated panels; a bedroom rewards texture and colour; a hallway needs a slim profile that does not eat into clearance.
Criteria to weigh before buying:
- Material and look: does the surface texture and colour suit the room’s existing palette and style?
- Ease of install: is the system genuinely no-drill, or does it require tools, battens, or specialist adhesive?
- Rental-friendliness: what is the realistic damage risk on your specific wall surface?
- Kit size and extension options: can you add panels later if you want to extend the feature wall?
- Cost per kit: does the price include delivery to your NZ address?
- Time to install: is this a solo afternoon project or does it need two people?
- Styling flexibility: can you rearrange or reuse the panels in a different home?
Questions worth asking any supplier:
- Do you offer a sample kit, and is the cost credited toward a full kit purchase?
- What adhesive system does the kit use, and has it been tested on standard painted plasterboard?
- What is your returns policy if the panels do not suit my wall?
- Do you provide layout guides or styling support?
- What is the delivery timeframe to my region in New Zealand?
Trust signals that matter: clear installation guides with photos, a sample-kit policy, NZ delivery, and real customer photos showing the panels in rental settings. These signals tell you the brand has thought through the renter’s situation, not just the product. For a broader look at kit choices and alternatives, Liftedplus’s comparison guide covers the main options across budgets.
Why do PET felt modular panels work so well for renters?
DwellForms™ is a no-drill, adhesive-mounted PET felt modular system designed specifically for renters and NZ homes. It is one of the most considered options in this category because the entire system, from the panel material to the adhesive pad specification, has been built around the constraints of rental living.
What makes DwellForms™ work for renters:
- 100% recycled PET felt. The panels are precision-cut from recycled plastic, giving them a consistent, tactile surface that holds colour with depth and warmth.
- Tested adhesive pads. No drilling, no screws, no battens. The adhesive system is specified for the panels, not a generic hardware-store alternative.
- Modular extension kits. Start with a core kit and add extension panels as your confidence or your wall grows. The DwellForms™ Skyline extension kit is designed to align precisely with the core kit layout.
- Colour range and sample kits. Multiple colourways are available, and sample kits let you test a colour in your actual room before committing. The sample cost is credited toward a full kit purchase.
- NZ-designed and NZ-delivered. The system is designed for the conditions and wall types common in New Zealand homes.
Installation notes specific to DwellForms™: apply firm, even pressure to each panel for the full recommended time. Allow the full cure period before touching or loading the panels. Repositioning is possible within the first few minutes of placement; once the adhesive has cured, removal should follow the slow, low-angle method described above.
Pro Tip: Order the DwellForms™ sample kit before committing to a full colourway. Live with the sample on your wall for two to three days, in morning light and evening light. The colour you choose with confidence is the colour you will love for the life of the tenancy.
A note from our design perspective
Blank rental walls are not a design problem. They are a design opportunity that most people walk past every day. The instinct to wait until you own a home before making your walls feel personal is one worth questioning. Colour, texture, and form are not renovation decisions — they are choices you can make this weekend, with a kit that comes back off the wall when you move.
My recommendation for anyone starting out: pick one wall, order a sample, and let the colour do the work. You do not need to commit to the whole room. One considered feature wall changes how a space feels entirely.
DwellForms™ wall kits: colour and texture without the renovation
If you have read this far and you are ready to move from ideas to action, DwellForms™ by Liftedplus is the most direct route to a renter-friendly feature wall in New Zealand.

Each core kit covers a defined wall area and comes with tested adhesive pads, a layout guide, and access to Liftedplus’s styling support. If your wall is larger, the extension packs align precisely with the core kit so the layout scales without visible joins. Sample kits are available for every colourway, and the sample cost is credited toward your full kit purchase — so testing colour costs you nothing in the end.
Delivery covers New Zealand, and the DwellForms™ Skyline Kit product page shows current colourways, kit dimensions, and ordering details. If you want to explore the full range first, the DwellForms™ collection hub is the place to start.
Sources
- Removable wall paneling for flexible design solutions
- Installing wall panels: 9-step guide | NordPaneele
- Decorative wall paneling ideas and pictures | HGTV
FAQ
What are the easiest removable wall panels to install?
Lightweight 3D foam panels and peel-and-stick tiles are the easiest options, requiring no tools beyond a tape measure and a level. PET felt modular kits like DwellForms™ take slightly longer to dry-fit but use the same no-drill adhesive approach.
What is the cheapest way to create a temporary feature wall?
Self-adhesive 3D foam panels are the lowest-cost entry point, typically ranging from NZD $55–$145 for a standard 3.6 m² feature wall. Peel-and-stick tiles are similarly affordable and suit smaller accent areas.
What are the key wall panel trends for 2026?
Slim vertical slats, tactile PET felt surfaces, sculptural grid layouts, and bold saturated colours (terracotta, deep teal, warm sage) are the strongest directions for 2026, with LED backlighting behind modular panels gaining traction in media walls and home offices.
What can renters use instead of traditional wall panelling?
Renters can use peel-and-stick slat strips, adhesive-mounted PET felt modular kits, cork tiles, or lightweight faux-brick panels — all of which install without drilling and remove without significant wall damage on smooth, painted plasterboard surfaces.