

Last Updated: November 5, 2026
Quick Summary
Aesthetic wall treatments for renters work when you match the product to your wall and test it first. Removable wallpaper, felt panels, adhesive strips, decals, fabric and washi tape can all transform a rental, but each carries a different removal risk. Always test adhesive on an inconspicuous corner for 48 hours before committing.
- Clean and dry walls fully before applying peel-and-stick wallpaper to avoid bubbles and paint lift.
- Test any adhesive offcut in a corner for 48 hours, then peel slowly to check for paint lift.
- Felt panel kits need no paint, no drilling and no renovation, and can be moved and reconfigured.
- For a 3m by 2.4m wall, buy about 7.9m² after adding 10% for cuts.
- Ask your landlord in writing before installing anything adhesive or fixed, and keep the reply.
Table of Contents
- Why Aesthetic Wall Treatments for Renters Need a Different Approach
- Removable Wallpaper for Renters: Patterns, Pitfalls, and Prep
- Renter-Friendly Wall Panels: Modular Kits That Move With You
- Damage-Free Wall Art Hanging: Adhesive Strips, Hooks, and Leaning
- Temporary Wall Coverings: Decals, Murals, Fabric, and Washi Tape
- Surface Compatibility and Paint Testing Before You Stick Anything
- Lease Rules, Landlord Approval, and Removal Risk
- Budget and Coverage: Calculating What Your Wall Actually Needs
- Frequently Asked Questions
Why Aesthetic Wall Treatments for Renters Need a Different Approach
Aesthetic wall treatments for renters solve a specific problem: how to put your stamp on a space you don’t own, without losing your bond when you leave. Lifted Plus builds wall products for exactly this situation.
The core tension is simple. Anything that sticks to a wall can take the paint with it. Anything that’s truly removable tends to be lighter, thinner, or more temporary than it first appears. Most buying guides skip that trade-off entirely.
Below, we break down each major treatment, how to install it, what it costs you in risk, and how to test your walls first. The order matters less than the testing step, which most renters skip.
Removable Wallpaper for Renters: Patterns, Pitfalls, and Prep
Removable wallpaper is a peel-and-stick wall covering designed to lift off without damaging the surface underneath. It gives you full-wall pattern coverage, which is why it’s the first thing most renters consider.
The catch is prep. Peel-and-stick wallpaper bonds to whatever it touches, including dust, grease, and loose paint. A wall that hasn’t been cleaned and primed will produce bubbles, curling edges, and, on removal, patches of missing paint.
Many peel-and-stick wallpaper brands sell rent-friendly collections with florals, geometrics, and murals. Check removal performance on your specific paint finish before committing to a whole wall.
How to Install Peel-and-Stick Wallpaper Without Bubbles
- Clean the wall with a damp cloth and let it dry fully.
- Test a small offcut in a corner and leave it 48 hours before removing.
- Measure the wall and cut panels with 5cm overlap at each edge.
- Start at the top corner and peel the backing down gradually, smoothing as you go.
- Use a felt-edged squeegee to push air toward the edges, not from the centre out.
- Trim overlaps with a sharp blade against a straight edge.
Watch out: applying wallpaper over freshly painted walls before the paint has fully cured is one of the most common causes of paint lifting on removal.
Renter-Friendly Wall Panels: Modular Kits That Move With You
Renter-friendly wall panels are rigid or semi-rigid modular tiles that attach to a wall and can be removed and rearranged. Unlike wallpaper, they add physical texture and depth, and they travel with you when you move.
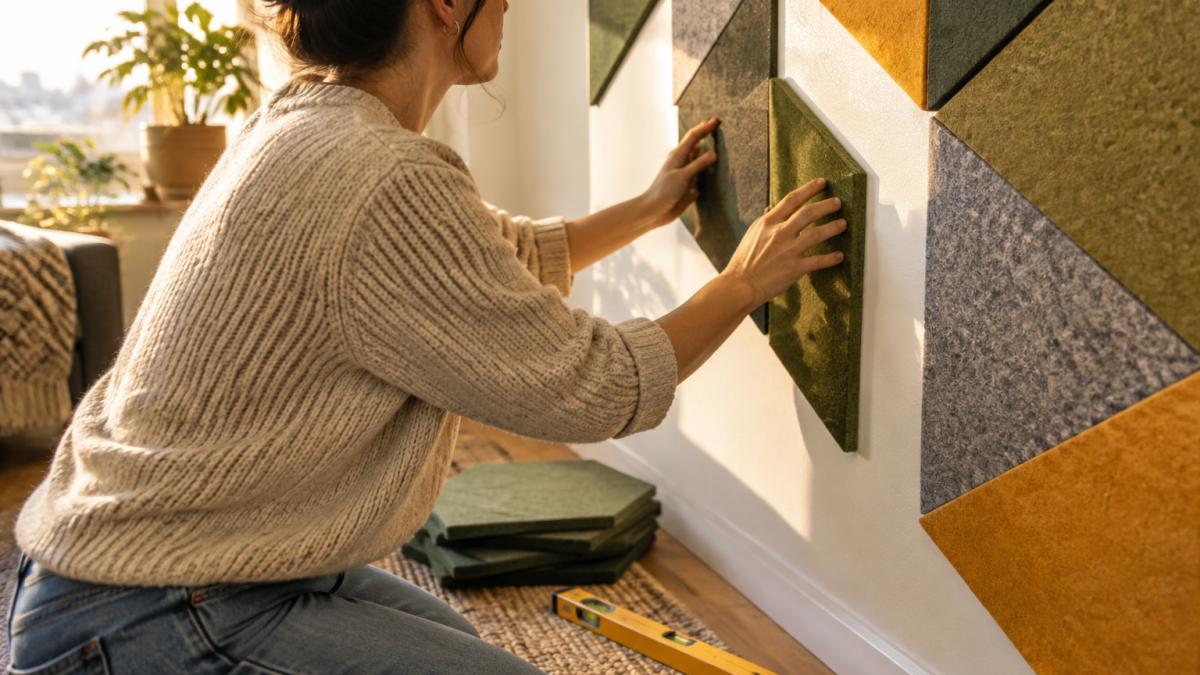
Our DwellForms™ kits are built on this principle: 100% recycled PET felt panels that require no paint, no drilling, and no renovation. They add colour, texture, and architectural shape, and they’re designed to be moved and reconfigured.
Panels suit flat, sound walls best. Heavily textured surfaces and awkward corners need extra planning, and adhesive performance varies with wall condition.
Step-by-Step: Installing No-Drill Felt Panels
- Check the wall for flaking paint, damp, and texture; smooth walls hold best.
- Plan your layout on the floor first, so you know the pattern before anything sticks.
- Clean and dry the wall completely.
- Apply adhesive pads to the back of each panel per the instructions.
- Press panels into place, working from the centre of your design outward.
- Cut around sockets and switches with a sharp blade before pressing fully.
- Leave 24 hours before hanging anything nearby.
For the full method, including wall checks and cutting around sockets, see our felt wall panels installation guide.
Damage-Free Wall Art Hanging: Adhesive Strips, Hooks, and Leaning
Damage-free wall art hanging means displaying framed prints and gallery walls without nails. Removable adhesive strips and hooks are the standard approach, and they work well within their load limits.
The failure mode is weight.
Leaning artwork is the zero-risk option: rest frames on a picture rail, shelf, or the floor against the wall. It suits large prints and works in small spaces, though it eats floor area.
Before you stick anything, read our guide to renter safe adhesives covering what the law says and how to remove strips without losing your bond.
Temporary Wall Coverings: Decals, Murals, Fabric, and Washi Tape
Temporary wall coverings sit between “a poster” and a full wallpaper job. They are the lowest-commitment way to change a wall, but they are not interchangeable: each has a different adhesive mechanism, a different coverage ceiling, and a different removal profile. Choose based on how much wall you need to cover and how confident you are in the paint underneath.
- Wall decals and removable murals: large vinyl graphics that create a focal point without covering the whole wall. Most are cut from thin vinyl with a low-tack adhesive, so they conform to flat paint but bubble over texture. They suit a single feature area, behind a cot, above a desk, or on a chimney breast, rather than a full room. Removal is usually quick, but on flat paint the vinyl can lift a fine layer of paint if it has been in place for more than a season.
- Fabric wall coverings: lightweight textiles hung from a rail, tension rod, or a row of clips, adding texture with no adhesive at all. This is the safest option for walls you cannot touch, and the fabric is reusable. The trade-off is that fabric does not sit flush, so it reads as soft furnishing rather than a finished wall, and it collects dust in humid rooms.
- Washi tape designs: low-cost geometric or border patterns, best for small accent areas such as a headboard outline or a frame border. Washi tape is paper-based and low-tack, so it removes cleanly from most sealed paints, but it is not designed to hold weight or span large gaps. Buy a roll and test a 10cm strip on the wall before committing to a pattern.
- Stencils: reusable, but the application method usually involves paint, which most leases prohibit. If you want the stencilled look without paint, a removable decal in a stencil pattern is the closer match to a renter-safe method.
A common pattern is that renters buy decals or washi tape expecting wallpaper-level impact, then find the wall still looks bare. If you want full-wall coverage, move up to removable wallpaper or panels; if you want a focal point with minimal risk, decals and washi tape are the right tools.
Surface Compatibility and Paint Testing Before You Stick Anything
Surface compatibility is the single biggest predictor of whether a treatment removes cleanly. Gloss and satin finishes grip adhesive more than flat finishes, and flat paint is more likely to lift.
Run this test before any adhesive product touches your wall:
- Stick a small offcut or strip in an inconspicuous corner.
- Leave it 48 hours at normal room temperature.
- Peel it slowly and inspect for paint lift, residue, or discolouration.
- Check the wall behind furniture, where paint is often older and less stable.
If the test lifts paint, stop. No adhesive product is worth a repaint deduction. Our article on whether adhesive wall panels damage paint covers what to look for in more detail.
Lease Rules, Landlord Approval, and Removal Risk
Landlord approval is where most renter decorating plans quietly fall apart. Tenants should generally seek landlord consent before making alterations, and fixtures installed without consent can become a bond issue at exit. Check your tenancy agreement and the official guidance from the Tenancy Services website.
The practical approach:
- Ask in writing before installing anything adhesive or fixed.
- Keep the reply; it’s your evidence if a deduction is disputed.
- Photograph walls before and after removal.
- Budget for minor patching as a realistic cost of doing business.
For a full walkthrough that ties tenancy rules to no-drill installation and removal, use our six-step bond protection checklist.
Budget and Coverage: Calculating What Your Wall Actually Needs
Coverage maths is where budgets blow out. Measure the wall height and width in metres, multiply for total square metres, then subtract doors, windows, and built-in furniture. Add 10% for cuts and mistakes. For a 3m-wide wall with a 2.4m ceiling, that is 7.2m² before deductions.
Then compare cost per square metre across options. Wallpaper and decals are priced by area; panels are priced per kit, so work out how many kits fill your measured area.
Worked example: a 3m × 2.4m accent wall is 7.2m². Add 10% for cuts, giving about 7.9m² to buy. Price that figure against current listings to see the total cost.
Our advice: price the full wall before you fall in love with a pattern, and check what the treatment costs to remove or repair if something goes wrong. For felt panels specifically, our guide on where to buy felt wall panels covers styles, sizing, and what to check on fire ratings before ordering.
| Treatment | Coverage | Removal Risk | Reusable |
|---|---|---|---|
| Removable wallpaper | Full wall | Medium to high on flat paint | No |
| Felt wall panels | Partial to full | Low with correct prep | Yes |
| Adhesive strips and hooks | Small areas | Low within load limits | No |
| Decals and murals | Focal point | Low to medium | No |
| Fabric coverings | Full wall, hung | Very low | Yes |
| Washi tape | Accent areas | Low | No |
Frequently Asked Questions
How can renters decorate walls without damaging them?
Start with treatments that rely on removable adhesive or no adhesive at all. Peel-and-stick wallpaper, modular felt panels, adhesive strips for framed prints, and washi tape designs all avoid nails and paint. Test any adhesive on a hidden patch first, clean the wall before applying, and remove slowly at a low angle. Always check your tenancy agreement for clauses on wall alterations, and photograph the wall before and after so you have a record if your landlord questions anything at inspection.
Can removable wallpaper damage rental walls?
It can if the paint is already flaking, the wall is textured, or the wallpaper stays up for years. Freshly painted walls need at least four weeks to cure before you apply anything adhesive. On glossy or wash-and-wear finishes, some adhesives bond too strongly and lift paint on removal. Test a small square in a corner, leave it for a week, then peel it back. If the paint lifts, choose a non-adhesive treatment like freestanding panels or leaning artwork instead.
What can I use instead of nails to hang wall art?
Removable adhesive strips and hooks carry most lightweight frames, provided you match the strip’s load rating to the frame’s weight and stick them to a clean, flat surface. For heavier pieces, lean framed prints on a shelf, sideboard, or picture ledge. A gallery wall of lightweight frames arranged on the floor first, then fixed with adhesive strips, avoids drilling entirely. Keep spare strips on hand so you can reposition art without damaging the wall or the frame.
Are peel-and-stick wall panels removable?
Modular panel kits designed for renters, such as Lifted Plus DwellForms™, are built to be taken down and reconfigured. They attach without drilling and are designed to be moved and reconfigured. Check the product guidance on the wall finishes the panels suit, and avoid textured or freshly painted walls.
How do I calculate how much wall treatment I need?
Measure the wall’s height and width in metres and multiply them to get square metres. Subtract the area of doors, windows, and built-in furniture. Add 10 percent for offcuts and pattern matching on wallpaper, or round up to the nearest panel kit for modular systems. For a 3 m by 2.4 m wall, that is 7.2 square metres before deductions. Pricing depends on quantity, delivery, and the specific product, so check current prices on the Lifted Plus website or request a quote.
The treatments that survive a tenancy are the ones you tested before you stuck them. If you want colour, texture, and shape without paint or drilling, explore DwellForms™ from Lifted Plus: modular, 100% recycled PET felt panels that install without tools, move with you between rentals, and reconfigure in any room shape. Get started with Lifted Plus and turn a blank wall into an interior that actually feels like yours.

