

You get colour blocking without paint by mounting removable, modular PET-felt panels straight onto your wall, no brushes, tape lines, or landlord phone calls required. Kits like DwellForms™ by Lifted+ use precision-cut felt blocks and tested adhesive pads to build bold, sculptural colour zones in an afternoon, then let you pull them down and take them to your next place.
Three things make this the version of colour blocking worth your time:
- No-drill installation — tested adhesive pads hold panels securely without touching your wall with a drill bit.
- Reusable, portable panels — modular wall panels move house with you instead of ending up in landfill when the lease is up.
- Sample kits that count toward a full order — test your colours risk-free, then apply that cost to the kit you actually buy.
DwellForms™ panels are cut from 100% recycled PET felt, so the colour block you’re building is also a small, deliberate sustainability choice, not just a design one.
Key Takeaways
Colour blocking without paint works best when renters use removable, modular PET-felt panels with tested no-drill adhesive systems and start with a sample kit before scaling up.
| Point | Details |
|---|---|
| Skip paint, use panels | Removable PET-felt panels deliver colour-block impact without touching your lease or your bond. |
| Adhesive pads suit most walls | Tested no-drill adhesive pads work for the majority of rental surfaces when the wall is clean and cured. |
| Sample before you commit | A colour sample kit lets you test shade and texture, and its cost credits toward a full order. |
| Partial coverage looks intentional | Leaving raw wall around a colour block usually reads more architectural than edge-to-edge coverage. |
| DwellForms™ is the renter-ready option | DwellForms™ by Liftedplus offers Skyline, Linear Feature, and Core Kits, all removable and made from recycled PET felt. |
Table of Contents
- What is colour blocking without paint?
- Why modular panels are the renter-friendly way to colour block
- How does colour blocking with panels actually work?
- Choosing the right kit, colours and layout
- No-drill installation: a step-by-step guide
- Styling ideas that make a colour block feel architectural
- Removal, reuse and a landlord-friendly checklist
- What does a colour-block panel kit cost?
- Why we recommend modular PET-felt kits for renters
- Get your colour-block wall from DwellForms™
- Sources
- FAQ
What is colour blocking without paint?
Colour blocking without paint means building blocks of saturated colour on a wall using physical, removable material instead of pigment. Where the painted version of colour blocking relies on tape lines and a steady hand, the paint-free version relies on precision-cut panels you stick, click, or hang into place. For renters, that distinction is everything: one method needs painter’s permission and a weekend of prep and cleanup; the other needs a tape measure and an hour.
Why modular panels are the renter-friendly way to colour block
Paint and wallpaper both assume you’re staying put. Modular panels assume the opposite, and that’s exactly why they work for the way most renters actually live now.
The visual effect is the same as paint. A cluster of saturated felt blocks reads as intentional colour, not decoration stuck to a wall, largely because scale and geometry hold the room the way a good paint job would. But the mechanism underneath is completely different. Instead of a chemical bond between pigment and plaster, you get a mechanical one between panel and adhesive pad, which is what makes the whole thing reversible.
That reversibility brings real practical upside beyond just avoiding a coat of paint:
- Damage-minimised mounting protects your bond without the guesswork of patching nail holes.
- Portability means a feature wall you love doesn’t have to stay behind when you move.
- Texture gives the wall a tactile, dimensional quality that flat paint can’t replicate.
- Sustainability comes from the recycled PET felt the panels are cut from.
None of that means every wall is a guaranteed win. Adhesion depends on the surface: fresh paint, textured plaster, and older wallpaper all behave differently under a mounting pad. Always test a small hidden area first, and treat any surface you’re unsure of as a reason to order a sample kit before committing to a full wall.
How does colour blocking with panels actually work?
Three things determine how a colour-block panel wall looks and behaves: the material, the mounting system, and how the two interact with your particular wall.
PET felt is the material doing the heavy lifting here. It’s dense enough to hold a true, saturated colour rather than looking washed out, and its slightly fibrous surface catches light in a way that flat paint never will. That texture is also why PET felt panels shouldn’t be painted over once you own them; a coat of paint clogs the fibre and dulls exactly the quality you bought them for. Compared to thin foam or basic PVC panels, felt reads less like a poster and more like an architectural detail.
Mounting is where most of the renter anxiety lives, so here’s how the main options actually compare:
| Mounting method | Best for | Trade-off |
|---|---|---|
| Adhesive pads | Most rental walls, quick setup | Needs clean, cured, dust-free surface |
| Interlocking panel systems | Larger multi-panel clusters | Requires accurate initial alignment |
| Magnetic mounting | Metal-backed or fitted surfaces | Limited to compatible wall types |
| Freestanding or tension supports | Non-permanent room dividers | Less flush, more footprint |
For the vast majority of rental walls, adhesive pads strike the best balance of hold, speed, and clean removal. Surface prep with isopropyl alcohol before you place anything is what separates a panel that stays put for two years from one that sags in six months.
Pro Tip: Test your adhesive pad on a coin-sized, hidden patch of wall 24 hours before installing the full layout, and always follow the manufacturer’s removal guidance rather than just yanking panels off. That one step protects both the wall finish and your bond.
Choosing the right kit, colours and layout
Before you order anything, measure the wall’s full height and width, then measure again with your furniture in place. A colour block that looks bold on an empty wall can feel cramped once a bed frame or sofa back cuts across the bottom third of it. Decide early whether you want one oversized, centred block or a cluster of smaller panels working together. Both read as deliberate; a scattering of mismatched sizes rarely does.
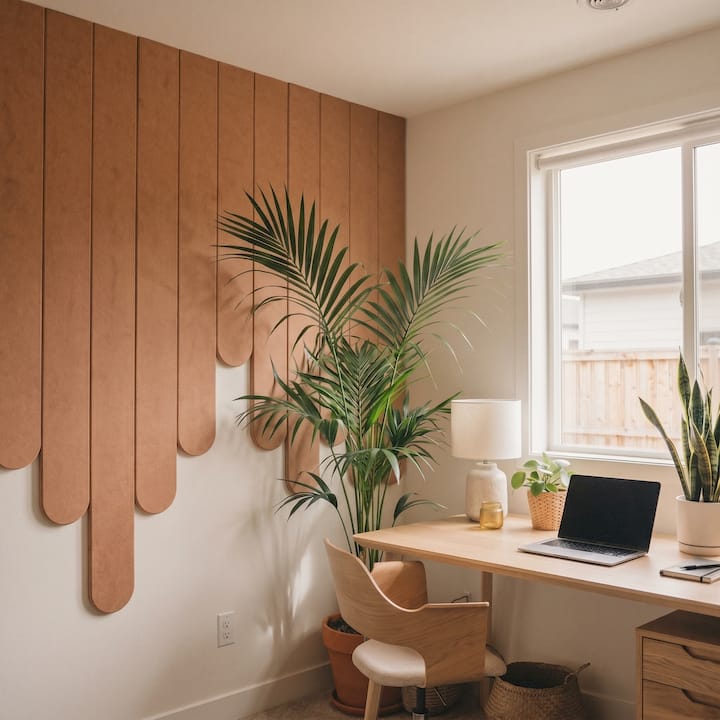
Layout changes what a colour block communicates in a room. A single large block centred behind a bed or sofa acts like a headboard the wall itself is wearing. A horizontal band behind a console table reads more like a graphic stripe, drawing the eye sideways rather than up. A geometric cluster of two or three shades suits a hallway or entry, where you want impact in a narrow glance rather than a slow reveal. Softer, tonal gradients using adjacent colours work well in bedrooms, where you want depth without visual noise.
If you’re not sure a colour will hold up against your actual lighting, order a colour sample kit before you commit to a full layout. Sample purchases from DwellForms™ credit toward a full kit order, so testing costs you nothing in the long run beyond a few days of patience.
No-drill installation: a step-by-step guide
You don’t need tools beyond a tape measure, a level, and a clean cloth. Here’s the practical sequence:
- Clean the wall. Wipe the surface with isopropyl alcohol and let it dry fully; any dust or grease will undercut the adhesive.
- Dry-fit your layout. Lay panels on the floor or hold them against the wall to confirm spacing before anything sticks.
- Mark your lines. Use painter’s tape and a level to keep the top edge straight, especially across multi-panel clusters.
- Apply the adhesive pads. Place them at the edges and centre of each panel, following the placement guide in your kit.
- Mount from the top down. Press each panel firmly for the full time your kit specifies, working from the top row so weight settles correctly.
- Step back and adjust. Check the layout from across the room before the adhesive fully cures, while minor shifts are still possible.
Budget one to three hours for a single feature wall, depending on how many panels you’re working with and how precise your layout is. Avoid mounting onto surfaces that are damp, freshly painted, or still curing; DwellForms™ kits include a layout guide, and for heavily textured plaster or unusual wall finishes, it’s worth checking that guide closely before you start.
Styling ideas that make a colour block feel architectural
A colour block only reads as design, rather than decoration, when it’s placed with intention. Six layouts consistently deliver that effect:
- Bedroom headboard wall — a single bold block behind the bed frame, sized to extend slightly beyond the mattress width.
- Sofa feature wall — a lower, wider block that sits just above the sofa back rather than covering the full wall.
- Hallway runner — a narrow vertical band that draws the eye down a corridor.
- Home office focal wall — a muted or tonal block positioned behind your desk, in camera view for video calls.
- Kids’ room playful blocks — smaller, brighter clusters at a child’s eye level rather than adult sightlines.
- Rental kitchenette accent — a compact block behind open shelving or a bench, where full paint isn’t an option anyway.
Layering matters more than coverage. A colour block paired with a floating shelf, a piece of art hung just off centre, or a warm lamp reads as a considered room, not a feature wall bolted on for effect. Partial coverage, leaving raw wall visible around the edges of the block, often looks more intentional than covering the entire surface.
Pro Tip: Resist the urge to colour block an entire wall edge-to-edge on your first attempt. A partial block with visible breathing room on either side almost always looks more deliberate than full coverage, and it’s far easier to extend later with an add-on pack.
Removal, reuse and a landlord-friendly checklist
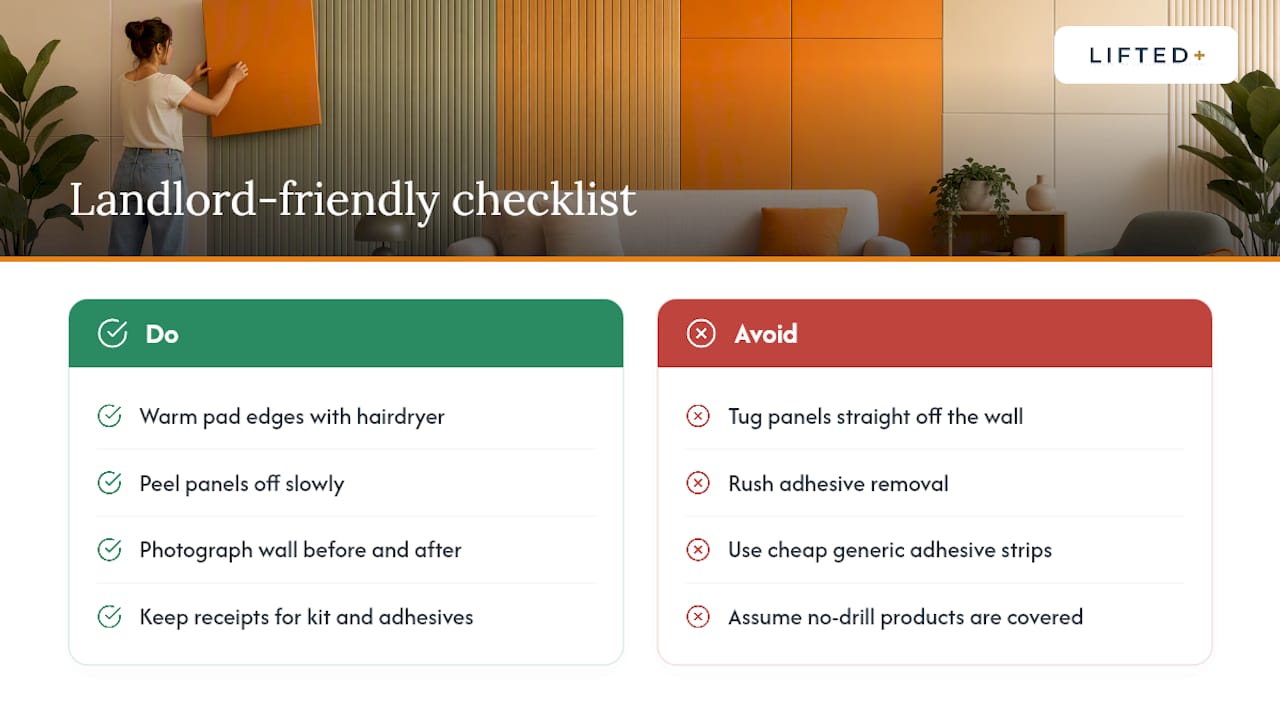
Panels come down the same way they went up: carefully, and without rushing the adhesive. Warm the pad edges gently with a hairdryer on low heat, then peel slowly rather than tugging straight off the wall. Manufacturer-approved solvents will lift any residue left behind, and branded acrylic adhesives are far less likely to pull paint than cheap generic strips, which are the most common cause of accidental wall damage during removal.
Once panels are down, label the backs with their layout position before storing them flat in a dust-free cover. That small step saves real time if you reassemble the same design in a new home. Keep a few spare adhesive pads on hand, and pack your original sample kit; it’s the fastest way to check colour compatibility against a new wall’s lighting before you recommit.
For your bond, document the wall’s condition with photos both before installation and after removal. Keep receipts for your kit and any adhesive pads used, since that paper trail matters if a landlord questions the wall’s condition later. If your lease has specific clauses about wall alterations, read them before you start, and when in doubt, ask your landlord directly rather than assuming a no-drill product is automatically covered.
What does a colour-block panel kit cost?
Pricing generally falls into three bands, driven by panel material, kit size, and whether you’re choosing standard or custom colours. Entry-level sample kits sit at the low end and are designed purely for colour testing. Mid-range kits cover a single accent wall’s worth of panels, enough for the layouts described above. Premium tiers add extension packs, custom colourways, or the panel count needed for a full-height, wall-to-wall statement.
A practical buying sequence looks like this:
- Order a sample kit to check colour and texture against your actual wall and lighting.
- Measure and plan your layout using the sizing checklist from earlier in this guide.
- Order your full kit, adding extension packs if your wall is larger than a standard configuration.
- Receive your layout guide and adhesive pack, which walks through placement for your specific panel count.
Because sample purchases are credited toward a full kit order, testing your colour choice doesn’t add to your final spend, it just removes the guesswork before you commit.
Why we recommend modular PET-felt kits for renters
The single biggest thing that changes when you swap paint for panels isn’t the colour result, it’s the risk. Paint is a one-way decision the moment it dries; a panel wall stays reversible for as long as you own it. That difference matters more to renters than any amount of colour theory, because the real barrier to a bold wall was never taste. It was the fear of losing a bond over it.
What convinces us this approach holds up isn’t the installation speed, though an hour or two for a full feature wall is genuinely fast. It’s the sample kit model. Being able to test a shade against your actual wall, in your actual light, before spending on a full kit removes the one variable that makes most people default back to beige. Start small, live with it for a week, then scale up if it earns its place on your wall.
Get your colour-block wall from DwellForms™
Liftedplus built DwellForms™ around one problem every renter knows: the wall you’re allowed to change and the wall you actually want are usually two different things. These kits close that gap without a drill, a landlord dispute, or a repaint before you move out.

Choose from the DwellForms™ Skyline Kit for a bold, sculptural cluster, or the DwellForms™ Linear Feature Kit if a horizontal or banded layout suits your wall better. Both sit within the wider DwellForms™ Core Kits range, and extension packs are available if your wall runs larger than a standard configuration.
If you’re still deciding on colours, start with a DwellForms™ sample kit. It’s the lowest-risk way to see a shade against your own wall, and the cost of that sample is credited toward your full kit order when you’re ready to buy.
Sources
- Why modular wall panels are perfect for renters
- Best acoustic panels for apartments: renter‑friendly
- Peel‑and‑stick wall panels for renters: 7 picks (2026)
FAQ
Can you colour block a wall without painting it?
Yes. Removable PET-felt panel kits like DwellForms™ create colour-blocked feature walls using no-drill adhesive mounting instead of pigment.
Will adhesive panels damage rental walls?
Tested adhesive pads are designed to minimise damage on most clean, cured wall surfaces, though results vary with wall finish, so testing a small area first is always worth doing.
How long does it take to install a colour-block panel wall?
Most single feature walls take between one and three hours, depending on panel count and layout complexity.
Can I test colours before buying a full kit?
Yes. DwellForms™ sample kits let you test colour and texture against your wall, and the sample cost is credited toward a full kit order.
Do PET felt panels need any special care?
Avoid painting over PET felt, since it clogs the fibre and dulls the texture; otherwise, occasional dusting is generally all that’s needed.